This chapter contains the following topics:
Entering Basic Information for EmployeesYear-To-Date Totals
Multi-city multi-state information
State Jurisdiction Information
Printing Multi-City Multi-State Information
Printing an Employee Change Log
The Employees selection enables you to enter employees, print employee lists or employee labels, or print changes made to employee information.
Each employee record contains fields for employee number, address, pay rate, deductions, earnings, year-to-date totals, etc.
|
Note |
You must follow specific formatting rules for employee names to ensure proper alignment on Form W-2 and proper recording in the electronic W-2 file, printing of the Affordable Care Act 1095-C and ACA magnetic media. |
Select
Employees from the PR menu.
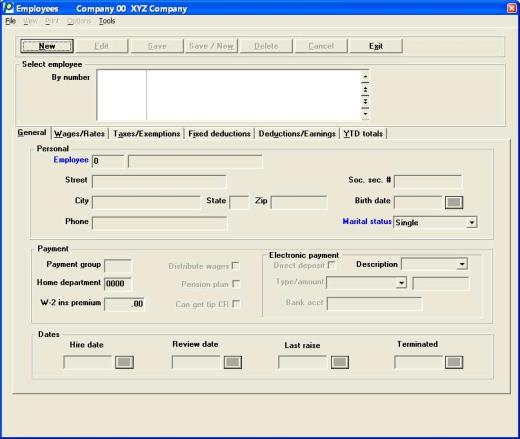
Graphical Screen
The following screen displays:
In the screen above, no employees have been entered.
The list box displays up to 6 existing employees at a time. You may sort the employees by employee number or name both in ascending or descending order. Only columns with red labels may be sorted. To select a field or change the sort order, click on the column name or the arrow to the right of the column name or use the View options.
To locate an employee, start typing an employee number or name, depending on which sort field is selected. You may also use the up/down arrows, Page up, Page down, Home and End keys to locate an employee. The <F1> and <SF1> keys function the same as the up/down arrow keys.
Employees that display in the list box are available for changes or deletion. The fields for the selected employee display in the lower part of the screen.
When an employee is found, you may select the <Enter> key or Edit button to start editing.
You may select a button or keyboard equivalent for adding, editing, or deleting an employee. Here is a list of the functions for each button:
| Button | Keyboard | Description |
|
New |
Alt+n |
To enter a new employee |
|
Delete |
Alt+d |
To delete the employee selected in the list box, You may also select the <F3> key |
|
Edit |
Alt+e |
To edit the employee selected in the list box |
|
Save |
Alt+s |
To save a new employee or changes to an edited employee |
|
Save/New |
Alt+w |
To save the new/edited employee and then start entering another employee |
|
Cancel |
Alt+c |
To cancel adding or editing an employee |
|
Exit |
Alt+x |
To exit the screen. You may also use the <Esc> key |
The menu at the top of the screen have various selections. The File, Tools, View and Help options are standard on every screen. The Print and Options menus have selections unique to this screen. These are described below.
Print Menu
The following table provides links for more information about each selection:
| Print menu selection | Link to more information |
|
Employee by employee number |
|
|
Employees by name |
|
|
Multi-city/State list |
Options Menu
The following table provides links for more information about each selection:
| Options menu selection | Link to more information |
|
Direct deposits |
|
|
Multi-city/State |
|
|
Extended information |
|
|
Employee notes |
|
|
State jurisdiction info |
See the Employees (Enter) section from the Pennsylvania Act-32 appendix |
Character Mode Screen
In character mode the following screen displays:
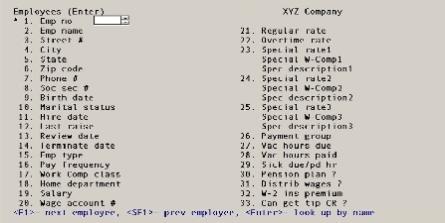
Use this screen to work with both new and existing employees.
Options
You have the following options on the character mode screen:
|
<F1> |
For the next employee on file, in employee number sequence |
|
<SF1> |
For the previous employee on file |
|
Blank |
To look up the employee by name |
If an employee has already been entered for the employee number you enter (or select by function key) that employee displays, the cursor is positioned at Field number to change ?, and you can change or delete that entry.
If you enter an employee number that is not already on file, the cursor progresses through all the fields in sequence so you can enter information about this new employee.
This is the first of six tabs required for each employee. Enter the information on this tab as follows:
Personal
This employee number is used throughout the Payroll package to identify the employee.
Enter the employee number. You may enter any number between 1 and 999999.
|
Format |
Numeric, 999999 |
|
Example |
Type 1 |
Employee name sequence
Options
If you choose to look up the employee by name, enter the name of the employee (or the first few characters of the name). Upper / lower case is significant using character mode.
|
<F1> |
For the next employee on file, in employee name |
|
<SF1> |
For the previous employee on file |
|
Blank |
To return to looking up the employee by number |
|
Format |
25 characters |
|
Example |
(not used in this example) |
Do not change the pay frequency of an employee who has a payroll entry (transaction) on file. If you do, the payroll is calculated with the employee’s original pay frequency. If you want to use a new pay frequency, delete the payroll entry, change the pay frequency, and then re-enter the payroll entry.
Entries on the fourth screen (showing year-to-date amounts) are protected from change. For protected changes, refer to the System Manager documentation. YTD information is updated automatically by the software.
Enter the employee name.
A first name and last name are required and must be entered per the Employee Name Format. See below.
|
Format |
25 characters |
|
Example |
Type Palmer, Edward W. |
The following rules must be followed when entering employee names. You must follow these rules if you want your employee names to print properly on W-2 forms and be properly represented in electronic W-2s.
You may enter any combination of lower and upper case. Checks are printed using the entered case. Printed W-2s and generated magnetic media convert all characters to upper case.
Enter the employee name using the following rules:
<Last><Space><Suffix> ,<Space><First><Space><Initial/Name>
The use of commas and spaces is very important as explained below:
<Last>
Enter the employee’s last name. Embedded spaces and multi-segment names are allowed.
|
Example |
Palmer, Van der Camp becomes Van der Camp Palmer |
<Space>
Enter a space only if you are going to enter a suffix such as Jr or Sr.
<Suffix>
Entry of a suffix is optional. If you do enter a suffix and you are going to be submitting electronic W-2s, you are limited to the following formats:
|
SR |
Sr |
sr |
II |
ii |
III |
|
JR |
Jr |
jr |
iii |
IV |
iv |
A period after the suffix is NOT allowed when submitting electronic W2s.
|
Examples |
Jones Sr, Robert A. becomes Robert A. Jones Sr |
Comma
Entry of a comma is required immediately following the employee’s last name or, if you are using one, the suffix. Only one comma may be present in the employee name field.
<First>
Enter the employee’s first name. The employee’s first name should contain no spaces.
|
Examples |
Edward, Susan becomes Susan Edward |
<Space>
Enter a space if you are going to enter a middle initial or middle name.
<Initial/Name>
A middle name or initial is optional. If you do use a middle name or initial, no spaces should be imbedded in the text. You may enter an initial with one trailing period or without a trailing period.
|
Examples |
Anderson, George L becomes George L Anderson |
Enter the employee’s street address. This field is required for printing W2s and generating magnetic media.
|
Format |
25 characters |
|
Example |
Type 715 Orange Tree Terrace |
Enter the name of the employee’s city. This field is required for printing W2s and generating magnetic media.
|
Format |
20 characters |
|
Example |
Type Orchard City |
Enter the standard postal code to identify the employee’s state. This field is required for printing W2s and generating magnetic media.
|
Format |
Two characters |
|
Example |
Type CA for California. |
Enter the employee’s zip code. This field is required for printing W2s and generating magnetic media.
|
Format |
Ten characters |
|
Example |
Type 90701 |
Enter the employee’s phone number. This field is optional.
|
Format |
25 characters |
|
Example |
987-773-8892 |
Enter the employee’s social security number. You must also enter the hyphens for it to appear in the correct format. Following entry or change, when the cursor is no longer on the field only the last 4 digits of the number displays. This field is required for printing W2s and generating magnetic media.
|
Format |
12 characters |
|
Example |
Type 415-59-6091 |
The first three digits of the social security number must be valid. If the number is not valid a message displays indicating SSN is invalid, check the 1st 3 digits. In addition, certain social security numbers are considered invalid by the Social Security Administration. For more information, see https://secure.ssa.gov/poms.nsf/lnx/0110201035. To find out that a number is valid, go to The Social Security Number Verification Service site at https://www.ssa.gov/employer/ssnv.htm.
If you enter a social security number that is already in a history record the program will display this warning: Social security exists in history file.
Enter the employee’s birth date. This field is optional.
Options
You have the following option:
|
<F4> |
In graphical mode, to select a date from the calendar lookup |
|
<F7> |
To access the date lookup in character mode. Click on the down arrow to open the calendar |
|
Format |
MMDDYY |
|
Example |
Type 10177 |
Options
Enter the employee’s marital status. You may select one of the following:
| Character mode | Graphical Mode |
|
S |
Single |
|
M |
Married |
|
H |
Head of Household |
This field determines which federal tax table is used when payroll taxes are calculated.
|
Note |
Head of Household employees have their federal withholding taxes computed from the table for single employees. |
|
Format |
One option from the drop down list |
|
Example |
Select Married |
Payment
You can assign employees to different payment groups. For example, all employees paid out of the same cash account can be assigned to the same payment group. Later, in Checks printing you can restrict check printing to only those employees in a specific payment group.
Entering a payment group is optional. You can leave it blank.
|
Format |
Three characters. Lower case is converted to upper case. |
|
Example |
Type ENG |
Enter the employee’s home department number. This field is optional.
The home department number is used in various payroll reports to give a breakdown of wages and deductions by department. You should not change an employee’s home department number if the employee has a payroll entry on file.
The word department as used here has no connection with the cost center of your account number format. The default name of the cost center (or of one segment of it, if there are two) is indeed department, but the system does not validate whatever you enter here against Cost Centers.
|
Format |
9999 |
|
Example |
Type 247 |
If you purchase group term life insurance for an employee and the coverage of this insurance exceeds an IRS specified limit enter the cost (premium) of the coverage in excess of the limit. This cost should be computed from a table provided by the IRS.
Although this cost is considered taxable wages paid to the employee, it is not subject to withholding for income tax purposes.
The amount entered here will be added to FWT gross and FICA gross on the employer’s W-2 form when it is printed or reported electronically. Refer to the Year-End Payroll documentation.
|
Format |
999999.99 |
|
Example |
Type 5 to enter $5.00 as the term insurance premium. |
Check the box if this employee’s pay is distributed manually to G/L accounts. Otherwise, leave it unchecked.
The default appearing in this field depends upon what you answered to the question Distribute wages in Control information:
| • | If you answered Never distribute, this field defaults to unchecked. |
| • | If you answered Always distribute, this field defaults to checked. |
| • | If you answered Selectively distribute, there is no default |
You can override the default if there is one.
In the Standard Payroll selection, entries are generated only for employees whose pay is notmanually distributed.
If you answered Selectively distribute to Distribute wages in Control information, a standard payroll entry is generated only if this field contains an unchecked.
|
Note |
If you interface with Job Cost, you must enter check the box for all employees whose wages are to be distributed to jobs. |
|
Format |
Check box, checked is Yes and unchecked is No |
|
Example |
Select <Enter> to signify that this employee’s pay is automatically distributed to the wage account on the employee’s record. |
Does this employee participate in a pension plan? Press the<Space bar> to check the box or press <Enter> to default to unchecked.
This information is required to correctly print the W-2 Form.
|
Format |
Check box, checked is Yes and unchecked is No |
|
Example |
Selected the <Space bar> to check it |
Are tip credits applicable to this employee? Select the space bar to get tip credit or press <Enter> to default no get tip credit.
This field is allowed only if PR Control information specifies that meals and tips are used in the Payroll package. Otherwise, it is automatically skipped.
Tip credits are used for an employee who is being paid less than minimum wage and receives tips.
The tip credit is the difference between the employee’s wage and the minimum wage.
If an employee works at different hourly wages, only the hourly wages that are below the minimum wage are used to calculate the tip credit.
Refer to the IRS Circular E booklet and the Federal Wage and Hour - Equal Pay law for more information on tips and tip credits.
|
Format |
Check box, checked is Yes and unchecked is No |
|
Example |
Press <Enter> |
Dates
Enter the date the employee was hired. The entry of a hire date is recommended if you are using magnetic media electronic W-2 reporting.
If PR Control information has the Enable Affordable Care Act functionality field checked, you must enter a hire date.
Options
You have the following option:
|
<F4> |
To select a date from the calendar lookup |
|
<F7> |
To access the date lookup in character mode. Click on the down arrow to open the calendar |
|
Format |
MMDDYY |
|
Example |
Type 70614 |
Enter the date the employee’s performance and pay are next scheduled for review. This field is optional
Options
You have the following option:
|
<F7> |
To access the date lookup in character mode. Click on the down arrow to open the calendar |
|
<F4> |
To select a date from the calendar lookup |
|
Format |
MMDDYY |
|
Example |
Type 80505 |
Enter the date of the employee’s last pay raise. This field is optional.
Options
You have the following option:
|
<F7> |
To access the date lookup in character mode. Click on the down arrow to open the calendar |
|
<F4> |
To select a date from the calendar lookup |
|
Format |
MMDDYY |
|
Example |
Type 101512 |
Enter the employee’s termination date. This field applies only for a terminated employee for whom payroll records are kept until both the Year-End Payroll and the Close a Year selections are run.
Press <Enter> to skip this field if the employee is still working for the company.
Affordable Care Act Question
If you are enabled to use the Affordable Care Act features and this employee has an ACA record, you will be asked this question:
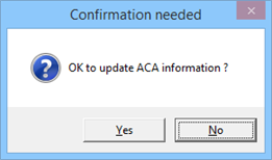

If you select Yes and if there is data entered for the four sets of Employee ACA info month fields (ACA FT/PT status, Monthly offer of coverage codes, Employee contribution and Coverage/safe harbor codes) that match the current fiscal year, this data will be removed from the employee ACA information starting the month after the termination date.
You may print a check for the employee even after they stop working due to unused vacation time or other reasons, if insurance is still being paid, you may want to enter a termination date after you stop printing the last check for the employee.
If you select No, the employee's ACA information will not be affected.
Options
You have the following option:
|
<F7> |
To access the date lookup in character mode. Click on the down arrow to open the calendar |
|
<F4> |
To select a date from the calendar lookup |
|
Format |
MMDDYY |
|
Example |
Press <Enter> |
The Wages/Rates tab has the following fields:
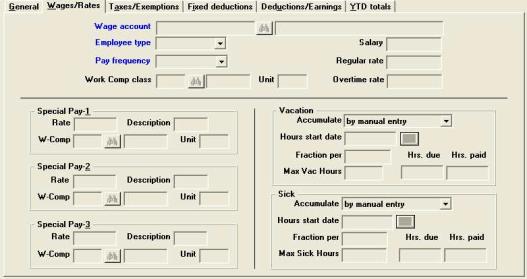
Enter the number of this employee’s wage account.
The number entered here is used as a default when entering information in Time Worked and Adjustments for pay being distributed to various accounts.
In other contexts, the cost center (or one segment of it) assigned here can be used in combination with main and subaccount in the Tax Tables selection to create a composite account number for payroll deductions.
Assigning employee wages to a cost center causes these expenses to be distributed to that same cost center.
|
Format |
Your standard account number format, as defined in Company information |
|
Example |
Enter account 6000-000 |
Options
Specify the employee type. The three choices are:
| Character Mode | Graphical Mode |
|
H |
Hourly |
|
S |
Salary |
|
N |
Non-Employee |
An hourly employee is paid at an hourly rate. A salaried employee is paid an amount that depends on the employee’s salary and pay frequency (Refer to the Pay frequency field).
Non-employees can also be considered vendors and paid through the Accounts Payable package. Both PBS Payroll and Accounts Payable can produce 1099-MISC reports for non-employees and specified vendors. Accounts Payable is more flexible as it provides tracking of multiple 1099 MISC types. Payroll only tracks non-employees. If both Accounts Payable and Payroll have the same EIN company, use one package or the other to produce your 1099-MISC forms. Do not use both.
Using character mode (Non-exempt) may display to the right of word Salary.For an explanation of Non-exempt, see the DOL Overtime Rule.
|
Format |
One option from the drop list box |
|
Example |
Select Salary |
Options
Enter the pay frequency code for this employee. The choices are:
|
Daily (also called Miscellaneous by the IRS |
|
Weekly |
|
Bi-Weekly |
|
Semi-Monthly |
|
Monthly |
|
Quarterly |
Withholding tax is calculated according to the employee’s pay frequency.
|
Note |
Do not change the pay frequency of an employee who has a payroll entry on file. If you do, the payroll still calculates the employee’s original pay frequency. If you want to use a new pay frequency, delete the payroll entry, change the pay frequency and re-enter the payroll entry. |
|
Format |
Use the Arrow keys to select one option from the drop list box |
|
Example |
Select Bi-weekly |
Enter the deduction/earning code for the workers’ compensation classification that applies to this employee. This function checks the code you entered to see if it exists in Deductions and Earnings.
This field is optional, but if present it must be an existing code in the Deductions/Earnings selection. Go to Deductions/Earnings for more information.
You can refer to the Deductions/Earnings selection for a definition of worker’s compensation classifications.
|
Format |
Three characters |
|
Example |
Type WC1 |
Enter the employee’s salary.
If the employee is not type S (salaried), this field is automatically skipped.
If the employee is salaried, after you enter the salary amount, the amounts for Fields #21-23 (regular rate, overtime rate, and special rate) are automatically calculated and displayed, based on the pay frequency specified and the number of hours in the pay period.
To facilitate the Department or Labor Overtime Rule, covered under the Fair Labor Standards Act, warnings in the PBS Payroll software are now being provided when it appears that compliance may not be met for salaried employees. To read more about The Overtime Rule, go to https://www.dol.gov and search for The Overtime Rule. As they are only warnings, there are no restrictions in the software as to how much you want to pay your salaried employees. If the employee's salary is under the yearly threshold, the word Non-exempt salaried display to the right of the Salary field. In character mode (Non-exempt) displays to the right of word Salaryof the Emp type field. Warnings also occur in these payroll functions:
Time worked (Enter) and Calculate payroll
A warning occurs when entering a Time worked transaction if a salaried employee has an Overtime rate of zero and overtime hours are entered.
From that point on, how the system functions depends on the setting for the Distribute wages field. If distributions are entered manually a distribution with an overtime rate of zero cannot be saved. However, if distributions are generated automatically, a zero rate per hour is accepted. With a zero rate per hour the following message prints on the Payroll Register during calculate:
Non-exempt salaried employee missing overtime rate !!!
Employee gross hours and wages
This report indicates when an employee had worked overtime hours but received no pay for those hours. When this is the case the following message prints on the report:
Non-exempt salaried employee missing overtime rate !!!
Using these warnings you may investigate, using PBS reports, to determine if the employee has received or is expected to receive an adequate salary per The Overtime Rule.
|
Format |
99999999.99 |
|
Example |
Type 1500 |
If the employee type entered in the Employee type field was H (hourly), or N (non-employee), enter the regular hourly pay rate for this employee.
If the employee type entered is S (salaried), the regular rate is calculated as the salary entered in the Salary field, divided by the number of hours in the employee’s pay period.
(The pay frequency that defines the pay period was entered in Pay frequency field. The number of hours in the pay period was entered in the PR Control Information.)
Options
Enter the employee’s regular rate or use the option:
|
<F2> |
For the calculated rate shown (where applicable) |
If the employee type entered is S (salaried), the overtime rate is automatically calculated and is equal to the Regular rate, times the overtime factor specified in the Control information.
If the Employee type is entered is Hourly or Non-employee, you can press <F2> to have the overtime rate calculated from the regular rate times the Overtime pay factor field entered in Control information.
|
Format |
99999.999 |
|
Example |
Press <F2> to accept the calculated rate. |
Options
Enter the employee’s overtime rate, or use the option:
|
<F2> |
For the calculated rate shown (where applicable) |
|
Format |
99999.999 |
|
Example |
Press <F2> to accept the calculated overtime rate. |
An employee can receive different pay for various work or different pay for various shifts. An employee can have up to three default special pay rates.
Options
Enter the employee’s special rate, or use the option:
|
<F2> |
For the calculated rate shown. This is the Regular rate multiplied by the special pay factor specified in the Special pay factor field in Control information. |
|
Format |
99999.999 |
|
Example |
Press <F2> to accept the calculated rate. |
This field is skipped if the special rate is zero.
Enter a literal to identify the special rate, for Example ADMIN, WHRHS, DLVRY for administration, warehouse, and delivery, or SHFT1, SHFT2, and SHFT3.
|
Format |
Five characters |
|
Example |
Type ADMIN |
This field is skipped if the special rate is zero.
Each special pay rate is assigned a workmans' compensation classification Refer to the Work Comp class field in this chapter, if you need additional information on Work Comp class.
This field is optional, but if present it must be an existing code in the Deductions/Earnings selection.
|
Format |
Three characters |
|
Example |
Type WC2 |
The second special rate is entered the same as the first, except that no default rate is calculated and the <F2> option is not available.
|
Format |
Refer to the Special pay 1 field |
|
Example |
Press <Enter> to default to zero |
The third special rate is entered the same as the first, except that no default rate is calculated and the <F2> option is not available.
|
Format |
Refer to the Special pay 1 field |
|
Example |
Press <Enter> to default to zero |
Accrued vacation and sick time is based on employee type, frequency and company policy. Employee type, salary or hourly, narrows your choice when selecting the accumulation frequency. Company policy will state how many weeks or hours of vacation/sick time can be accrued and when they can start.
When you set up the Fraction per take the total hours to be accrued for the year and divide by the number of paychecks in a pay frequency or the number of paid hours in a year if using hourly. If time periods were selected then divide the annual hours to be accrued by the number of periods in the year.
If paying hourly regardless of frequency and accruing on the basis of hours worked, the hours to be accrued will be based on company policy and not just the standard 2080 hours per year. The system will take the fraction entered and multiply it times hours worked per the pay period. This is hours worked, not holiday, vacation or sick hours paid as the base. The distinction is important because your first calculation could be based on the standard hours per year of 2080. If company policy allows two weeks per year and in a subsequent year an employee is paid for seven holidays, ten sick days and two weeks vacation he would only accrue 71.69 hours of vacation because the employee only worked 1864 hours. The 1864 hours is the standard year less holiday, sick and vacation time paid.
Salaried employees are a little more straightforward in the calculation. Hours to be accrued annually divided by paychecks in a pay frequency yields the number to be used in fraction per. Three weeks of vacation to be accrued, 120 hours divided by 26 for a bi-weekly employee, would be 4.6154 hours per pay period regardless of any holiday, vacation or sick time paid.
Vacation
Enter the rate by which the employee will accrue time during each pay period.
If the manual entry type is selected the Vac hrs start date, Fraction per and Max vac fields can not be entered.
The options are:
| Character | Graphical |
|
P |
per pay frequency |
|
H |
per hour worked |
|
M |
per month worked |
|
Q |
per quarter worked |
|
T |
per third-of-year worked |
|
S |
per half year worked |
|
X |
by manual entry * |
|
Y |
per year worked |
* When manual entry is selected, you will have to update the Hrs. due (Vacation) time manually or enter vacation hours in time worked.
|
Format |
Character mode: Enter a letter from the list above Graphical mode: Use arrow keys to select an option from the drop down list |
|
Example |
Select Per pay frequency |
Enter the date on which to start accruing vacation hours for this employee.
If you enter a number of hours to be accrued in Time Worked or Adjustments when the pay period ending date is before the date entered here, you are warned that vacation hours should not be accrued for this employee.
This date will not change or change according to these rules:
| • | When using a pay frequency of either per pay period, per hour worked or by manual entry, this field is only changed by manual entry. |
| • | If the pay frequency is either per month worked, per quarter worked, per third of a year worked, per half year worked or per year worked, this date is updated according to the frequency period when posting a check for this employee if the current Hours start date is less than the Pay period ending date. |
For example, if the frequency is per month worked and the Pay period ending date is 10/15/15 and the Hours start date is 09/20/15 the program will change this date to 10/20/15 during posting and the vacation hours are accumulated. If the Hours start date is after 10/15/15 the vacation hours will not be accumulated and this date will not be updated.
|
Format |
MMDDYY |
|
Example |
Type 10115 |
This field automatically displays the accumulate frequency method selected above, (for example, Fraction per hour or Fraction per six mo).
Enter the accrual rate.
|
Format |
999.99999 |
|
Example |
Type .03846 |
Options
Enter the maximum number of vacation hours which the employee is allowed to accrue, or use the option:
|
<F2> |
For Unlimited vacation hours |
|
Format |
999.999 |
|
Example |
Type 80 |
When setting up your Payroll system for the first time, you would normally set this field to zero for each employee entered. Also enter zero here for each new employee added.
Then on the fourth screen described later in this chapter, enter the fields for accruing vacation time.
Then when entering adjustments to set up your reporting from Payroll History, note the vacation time due and paid for each employee, and this field and the next (28) will be updated automatically.
After setup, you can review these fields for each employee and make any adjustments needed.
|
Format |
999.999- |
|
Example |
Type 35 |
This field contains the number of vacation hours paid so far this year to this employee. It is automatically updated when vacation hours are paid to the employee, either through Time worked or Adjustments.
The only time you would enter this field is when you first install the package (in the middle of a year) or when you enter a manual correction to this field. You can press <Enter> to default to zero.
|
Format |
999.999- |
|
Example |
Press <Enter> |
Sick
Options
Enter the rate by which the employee will accrue time during each pay period.
If the manual entry type is selected the Sick hrs start date, Fraction per and Max sick fields can not be entered.
The options are:
| Character | Graphical |
|
P |
per pay frequency |
|
H |
per hour worked |
|
M |
per month worked |
|
Q |
per quarter worked |
|
T |
per third-of-year worked |
|
S |
per half year worked |
|
X |
by manual entry * |
|
Y |
per year worked |
* When manual entry is selected, you will have to update the Hrs due (Sick) field manually or enter sick hours in time worked.
|
Format |
Use arrow keys to select an option from the Drop down list |
|
Example |
Select Per pay frequency |
Enter the date on which to start accruing sick hours for this employee.
If you enter a number of hours to be accrued in Time worked or Adjustments when the pay period ending date is before the date entered here, you are warned that sick hours should not be accrued for this employee.
This date will not change or change according to these rules:
| • | When using a pay frequency of either per pay period, per hour worked or by manual entry, this field is only changed by manual entry. |
| • | If the pay frequency is either per month worked, per quarter worked, per third of a year worked, per half year worked or per year worked, this date is updated according to the frequency period when posting a check for this employee if the current Hours start date is less than the Pay period ending date. |
For example, if the frequency is per month worked and the Pay period ending date is 10/15/15 and the Hours start date is 09/20/15 the program will change this date to 10/20/15 during posting and the vacation hours are accumulated. If the Hours start date is after 10/15/15 the sick hours will not be accumulated and this date will not be updated.
|
Format |
MMDDYY |
|
Example |
Type 10115 |
This field automatically displays the accumulate frequency method selected above, (for example, Fract per hour or Fract per six mo).
Enter the accrual rate.
|
Format |
999.99999 |
|
Example |
Type .03846 |
Options
Enter the maximum number of sick hours which the employee is allowed to accrue or use the option:
|
<F2> |
For Unlimited sick hours |
|
Format |
999.999 |
|
Example |
Press <F2> |
When setting up your Payroll system for the first time, you would normally set this field to zero for each employee entered. Also enter zero here for each new employee added.
Then on the third screen described later in this chapter, enter the fields for accruing sick time.
When sick hours are taken by the employee, the amount in this field is reduced when you enter the hours taken using Time Worked or Adjustments.
Then when entering Adjustments to set up your Payroll History, note the sick time paid and due for each employee, and this field will be updated automatically.
After setup, you can review this field for each employee and make any adjustments needed.
|
Format |
9999.999- |
|
Example |
Type 30 |
This field contains the number of sick hours paid so far this year to this employee. It is automatically updated when sick hours are paid to the employee through Time worked.
The only time you would enter this field is when you first install the package (in the middle of a year) or when you enter a manual correction to this field. You can press <Enter> to default to zero.
|
Format |
9999.999- |
|
Example |
Press <Enter> |
Options
You can also enter one of the following from the Options menu:
|
Extended information |
To enter extended information |
|
Employee notes |
To enter notes |
|
Multi-city/state detail |
To enter multi-city / state detail. In order for this selection to be available, on the Taxes/Exemptions tab you must have indicated that this employee will be taxed by multiple states or cities. |
|
Direct deposits |
To enter direct deposits. In order for this selection to be available, on the General tab you must have indicated that this employee will be paid via direct deposit and in Control information you must indicate that this system is using and Electronic payment direct deposit type. |
If you press <Enter> with this field blank the next tab displays.
Graphical Mode
This tab provides fields for entry of the taxes and exemptions:
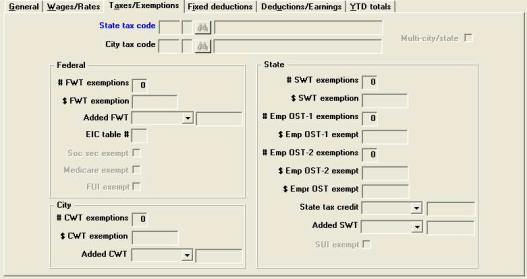
Character Mode
This is second screen lets you enter state and city tax information for employees.
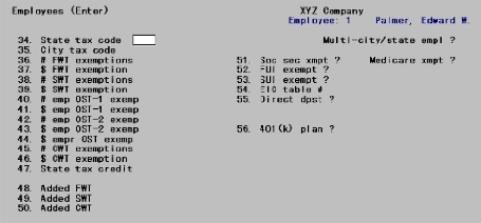
You must have at least one state tax code entry or you cannot complete the entry of the employee. See the State Tax Codes section in the Tax Tables chapter.
Enter the state tax code that applies to this employee. This field is entered in two parts, just as in the Tax tables selection, and must already be on file in that selection.
|
Format |
Two characters (for the state) One character (for the table) |
|
Example |
Type CA and then type M |
If this employee is subject to taxation by more than one state and/or by more than one city, check the box here. For instance, this might happen to employees who live in one state but work in another.
Home state and work state designations relate to the field SUI reporting method as defined in the SUI reporting method field in Control information. The first state you enter in the State tax code field is considered the home state. The work state is determined by what state is entered in the State field in Time worked.
Further particulars can then be entered for this employee.
|
Format |
Check box , either checked for Yes or unchecked for No. |
|
Example |
Select Enter for the default of unchecked |
Enter the city tax code that applies to this employee, similarly to the state tax code. If a city code is not used, skip this field by pressing <Enter>.
|
Format |
Two characters (for the city) One character (for the table) |
|
Example |
Press <Enter> |
Entering Exemptions
The following fields allow you to enter the number of exemptions claimed by the employee and an additional dollar amount.
The number of exemptions is multiplied by the annual withholding allowance you entered in the federal, state, or city tax table. Then the dollar amount of the exemption (entered here) is added to give the total allowance.
By entering both fields, complicated state and city tax situations can be handled. For most states or cities you have to enter only one of these.
Currently, federal withholding requires the number of exemptions only.
When entering the number of exemptions, up to two digits are allowed. If you enter 99 exemptions, this means that the withholding tax calculations are not to be made.
When an employee has 99 exemptions, the only tax that is withheld is that specified as an added tax amount. Refer to the discussion of added withholding tax following in the State tax credit field.
Federal exemptions
Enter the number of federal withholding tax (FWT) exemptions claimed by this employee, or press <Enter> to default to zero.
|
Format |
99 |
|
Example |
Type 4 |
Enter an additional dollar amount, if needed.
|
Format |
99999.99- |
|
Example |
Press <Enter> to skip this field. |
An additional amount may be withheld from the paycheck, at the employee’s request, over and above the calculated amount of the tax.
There are three ways of entering this information.
| • | As a percent of the taxable gross pay that is to be added. The caption displayed is percent. |
| • | As a flat dollar amount. The caption displayed is amount. It is treated as the amount of additional tax withheld per pay period. You can enter up to 7 figures including 2 decimal places. |
| • | As a surcharge. The percent of the calculated tax is added to the calculated tax to arrive at a final tax amount. The caption displayed is surcharge %. |
If 99 exemptions were entered for a particular withholding type, no tax will be withheld per pay period, other than what is specified for its corresponding added tax amount here. Refer to the Entering Exemptions section for more information.
For example, if there are 99 exemptions for federal withholding, all that is withheld per pay period is the added FWT amount in dollars entered here.
Enter the additional federal tax to be withheld.
|
Format |
99999.99 (amount) 99.99 (percent and surcharge %) |
|
Example |
Press <Enter> to default to zero |
Options
|
<Arrows> |
To select one of the three methods of data entry described above |
The EIC tables can no longer be entered in the Federal tax table. See Federal Tax Table - Tax Tables.
|
Format |
The default is 0. |
|
Example |
Press <Enter> |
Is this employee exempt from paying social security taxes? If you check the box, the payroll calculation does not withhold social security tax for the employee, nor is any employer social security liability calculated for this employee.
|
Format |
Check box, checked is Yes and unchecked is No |
|
Example |
Press <Enter> for the default of No |
Is this employee exempt from paying medicare taxes? If you check the box, the payroll calculation does not withhold medicare tax for the employee, nor is any employer medicare liability calculated for this employee.
|
Format |
Check box, checked is Yes and unchecked is No |
|
Example |
Press <Enter> for the default of unchecked |
Is this employee exempt from the federal unemployment insurance (FUI) tax usually paid by the employer? If you check the box, the employer’s FUI tax liability for this employee is zero.
|
Format |
Check box, checked is Yes and unchecked is No |
|
Example |
Press <Enter> for the default of unchecked |
Primary state exemptions
Enter the number of state withholding tax (SWT) exemptions claimed by this employee, or press <Enter> to default to zero.
|
Format |
99 |
|
Example |
Press <Enter> |
Enter an additional dollar amount, if needed.
|
Format |
99999.99- |
|
Example |
Type 2580 |
Other state Exemptions
The following five fields are used to enter exemptions for OST (other state tax). Refer to the discussion of the types of OST provided for in PBS Payroll at the beginning of the Deductions - Earnings chapter.
Enter the number of exemptions for employee OST-1.
|
Format |
99 |
|
Example |
Press <Enter> |
Enter an additional dollar amount, if needed.
|
Format |
99999.99- |
|
Example |
Press <Enter> |
Enter the number of exemptions for employee OST-2.
|
Format |
99 |
|
Example |
Press <Enter> |
Enter an additional dollar amount, if needed.
|
Format |
99999.99- |
|
Example |
Press <Enter> |
If there is an exemption amount for employer OST enter the amount of the exemption here.
|
Format |
99999.99- |
|
Example |
Press <Enter> |
An additional amount may be withheld from the paycheck, at the employee’s request, over and above the calculated amount of the tax.
There are three ways of entering this information.
| • | As a percent of the taxable gross pay that is to be added. The caption displayed is percent. |
| • | As a flat dollar amount. The caption displayed is amount. It is treated as the amount of additional tax withheld per pay period. You can enter up to 7 figures including 2 decimal places. |
| • | As a surcharge. The percent of the calculated tax is added to the calculated tax to arrive at a final tax amount. The caption displayed is surcharge %. |
Enter the additional state tax to be withheld.
|
Format |
99999.99 (amount) 99.99 (percent and surcharge %) |
|
Example |
Press <Enter> to default to zero |
Options
|
<Arrows> |
To move between the three methods of data entry described above |
If the employee’s state tax code specifies a gross wage cut-off amount, this percent is calculated on only the taxable gross pay over the cut-off amount.
|
Note |
A negative amount or percent reduces the tax amount. |
Enter the annual dollar amount of the tax credit for which this employee is eligible, or use the option:
If a percent is entered, the amount of the credit calculated and deducted before Added SWT field is added into the tax amount.
|
Format |
99999.99- (annual amount) 999.99- (percentage rate) |
|
Example |
Type 64 |
A tax credit is an amount that is deducted from the calculated tax. Added SWT field is added into the tax amount after the credit is taken.
Not all states allow for a tax credit, so you don’t need to enter an amount here if it is not applicable to your state.
Options
|
<Arrows> |
To toggle between entering an annual amount for the credit or a percentage rate used to calculate the tax credit. |
Is this employee exempt from the state unemployment tax normally paid by the employer? If you check the box, there is no SUI tax liability calculated for this employee.
|
Format |
Check box, checked is Yes and unchecked is No |
|
Example |
Press <Enter> for the default of unchecked |
City Exemptions
The following fields are used to enter exemptions for city tax.
Enter the number of exemptions that apply for city withholding tax (CWT) or press <Enter> to default to zero.
|
Format |
99 |
|
Example |
Press <Enter> |
Enter the annual dollar amount of the city withholding tax exemption or press <Enter> to default to zero.
|
Format |
99999.99- |
|
Example |
Press <Enter> |
An additional amount may be withheld from the paycheck, at the employee’s request, over and above the calculated amount of the tax.
There are three ways of entering this information.
| • | As a percent of the taxable gross pay that is to be added. The caption displayed is percent. |
| • | As a flat dollar amount. The caption displayed is amount. It is treated as the amount of additional tax withheld per pay period. You can enter up to 7 figures including 2 decimal places. |
| • | As a surcharge. The percent of the calculated tax is added to the calculated tax to arrive at a final tax amount. The caption displayed is surcharge %. |
Enter the additional city tax to be withheld.
If the employee’s city tax code specifies a gross wage cut-off amount, this percent is calculated on only the taxable gross pay under the cut-off amount.
|
Format |
99999.99 (amount) 99.99 (percent and surcharge %) |
|
Example |
Press <Enter> to default to zero. |
Options
|
<Arrows> |
To select one of the three methods additional amounts to be withheld as described above |
The Direct deposit field is not available for entry if you opted for no direct deposit in Payroll Control information. It is available if either the Report Only Method or Electronic Payment Method has been specified.
The order in which you enter the fields and number of direct deposit fields will vary depending on if you selected the Electronic Payment Method or the Report Only Method.
|
Format |
Check box, checked indicates the employee is paid via direct deposit and unchecked employee is not being paid via direct deposit |
|
Example |
Select <Space bar> for Check mark |
These options are only available if you selected Electronic payment method.
See Character mode if that applies.
Graphical Mode
If you selected Checked the box, you may enter the direct deposit accounts. To enter the accounts select Direct deposits from the Options menu. A screen displays that looks like the following:
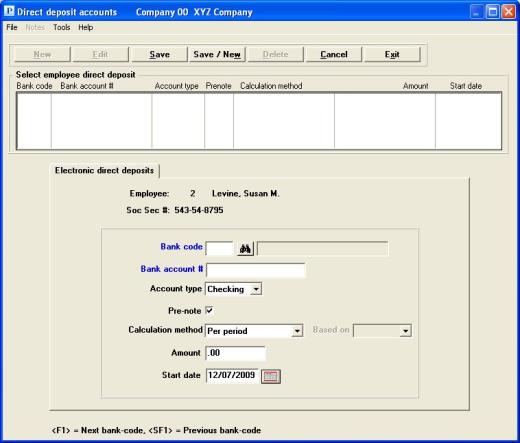
If you have not entered any accounts, the screen will display like above.
If you have entered some accounts, they display in the list box at the top of the screen. The details for the first account displays in the fields below.
You may enter up to 15 bank accounts per employee.
In the list box you have the following options to locate an existing employee:
|
<F1> or <Down arrow> |
For the next account on file |
|
<SF1> or <Up arrow> |
For the previous account on file |
|
<Page Down> |
For the next group of accounts |
|
<Page Up> |
For the previous group of accounts |
|
<End> |
For last account |
|
<Home> |
For first account |
You may select a button for editing, deleting or adding a new account:
|
New |
To enter a new account |
|
Delete |
To delete the account selected in the list box |
|
Edit |
To edit the account selected in the list box |
|
Save |
To save a new account or changes to an edited account |
|
Save/New |
Same as Save button plus the New button |
|
Cancel |
To cancel adding or editing an account |
|
Exit |
To exit the screen. You may also use the <Esc> key |
In character mode you must select field 55. Then a screen like the following displays:
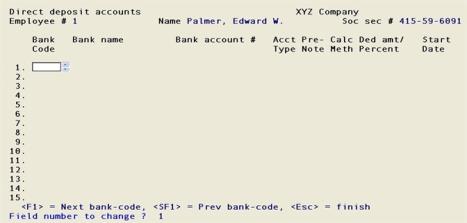
The second line displays the employee number, name and social security number. These fields are display-only and are not editable.
You may enter up to 15 bank accounts per employee.
If you are entering direct deposit accounts for the first time for this employee, the cursor will be on the Bank code field when this screen displays. If bank accounts have previously been entered for this employee the cursor will be at Field number to change.
You may also enter notes for each employee’s group of bank accounts.
Enter the following Electronic payment Direct Deposit fields:
If you are using the Electronic payment method, you may then enter this field. The bank code is where the bank information has been entered. This record includes the bank name and routing number.
Options
You can also use one of the following options:
|
<F1> |
For the next bank code on file. |
|
<SF1> |
For the previous bank code on file. |
|
<F3> |
To delete this bank account line. This option is only available if you have entered the bank account previously. |
|
Format |
4 characters |
|
Example |
MNH |
Bank name
This is a display-only field that displays the Bank code name.
Enter the employee's bank account number. This will appear on the Direct Deposit Register and will be written to the ACH file.
|
Format |
17 characters |
|
Example |
999999999 |
The account type field designates the type of banking account. Select Checking or Savings.
The account type is written in the Direct Deposit ACH file.
|
Format |
Drop list |
|
Example |
Savings |
This is the Pre-notification field and is used to determine if the employee bank account has a pre-notification or normal status. Check the box (yes) for pre-notification status or leave it unchecked (no) for normal Direct Deposit ACH status.
A Pre-notification status means that checks will be written normally, and when the ACH file is generated it will include the employee bank account with a zero dollar amount to deposit along with the bank routing number and bank account information. This file is sent to your bank to verify the employee’s bank routing number and bank account. Once this verification is done, the bank will notify you and you can then remove the Pre-notification status. Following the removal of the pre-notification status, when payroll checks are run, the ACH file will be generated with the designated payment amount as per a normal Direct Deposit check run.
|
Format |
Check box, checked means Yes and unchecked is No |
|
Example |
<Space bar> for check mark |
|
Note |
The initial setup of direct deposit, or any subsequent changes to the fields on this screen, initiates a pre-notification setting for the employee bank account. Overriding is not recommended. When you have pre-notification records for any employee you can either print checks with pre-notification records as part of the ACH file or you can run the Pre-note ACH File and Report PBS Payroll utility. This special utility is intended for reporting pre-notification employee bank accounts only. It also provides a feature that allows you to change the status of employee bank accounts from pre-notification to normal. |
This is the calculation method for the account.
Options
There are four options for this field.
|
Per hour |
As a rate per hour |
|
Percent |
As a percentage of the gross or net. See Based on field below |
|
Pay period |
As a flat dollar amount per pay period |
|
Balance of check |
For the balance of the check |
|
Format |
Drop down list with the options from above |
|
Example |
Balance of check |
What you enter in this field relates to amounts entered in the next field.
The bank accounts on this screen are automatically sorted by the calculation method number. However, the new sorting will not display until you exit this screen and return to view the data later.
You are only allowed to enter one balance of the check type per employee.
If you are not using a percentage Calculation method for this account you will not be able to enter this field.
If you are using a percentage, enter the percentage type. The percentage type can either be based on the Gross pay or the Net pay for the employee accounts.
|
Format |
Drop down list with the options from above |
|
Example |
Not used in this example |
Enter the amount to be directly deposited. If the balance of the paycheck is selected on the previous field you can not enter this field and a check is printed for $0.00. This check is marked as Void. The check is printed so that you can give the stub to the employee.
If you change the Calculation method field any amount previously entered in this field will be deleted.
|
Format |
9999999.99 (for dollar amount) 99.99 (for percent) 99999.99 (for rate) |
|
Example |
Press <F2> |
Enter the date when the ACH direct deposit process is started for this employee’s bank account.
This field is used when you run the Pre-note ACH File and Report utility. You can automatically update the pre-notification status from pre-note to normal based on the date entered in the utility Cut-off date field. If this date is before the cut-off the status is changed.
|
Format |
MMDDYY |
|
Example |
Type 70697 |
|
Note |
If you are using PBS Check Reconciliation, during the transfer of checks, direct deposit net pay amounts are transferred as a direct deposit ACH type and not a check type. There is a transaction number, rather than check number, associated with the ACH direct deposit payment. The transaction number is incremented based on an entry for the corresponding Cash account. |
Description
The following options are available if you selected the Report only method for direct deposit in Payroll Control information.
|
(1 or 2 Options) |
The available options depend on the entry in Direct Deposit Settings direct deposit description fields. Enter the first option to deposit all or part of this employees pay. (The second option is only available if you have entered more than one direct deposit account with description in Control information) |
|
Format |
Drop down list |
|
Example |
Does not happen with this example |
Enter the amount to be directly deposited. There are four ways of doing so:
|
per period |
As a flat dollar amount per pay period |
|
percent |
As a percent of the gross |
|
per hour |
As a rate per hour |
|
Balance of check |
For the balance of the net check |
Initially the per period method is assumed.
If Balance of check is used, a check is printed for $0.00. This check is marked as Void. The check is printed so that you can give the stub to the employee.
If you are using PBS Check Reconciliation, the void check is transferred to Check Reconciliation along with other payroll checks when you run Transfer checks/deposits in the Check Reconciliation module.
|
Format |
99999.99 (for dollar amount) 99.99 (for percent) 99999.99 (for rate) |
|
Example |
Press <F2> |
This field displays only if direct deposit has been specified in Control information as the report only method. The bank account number cannot be entered if unchecked the Direct Deposit field.
Otherwise, enter the employee’s bank account number. This will appear on the Direct Deposit Register.
|
Format |
17 characters if Electronic payment direct deposit method and 20 if Report only. |
|
Example |
999999999 |
This tab provides fields for the fixed deductions entries:
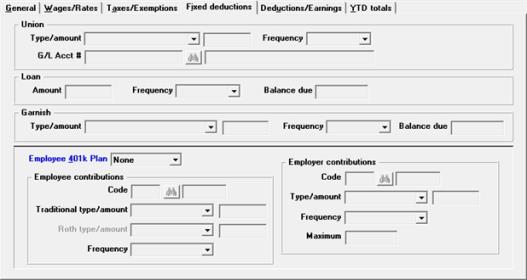
Deduction Frequencies
Each of the deductions below requires a frequency. You can enter any valid pay frequency. The default is the pay frequency already specified for this employee. If the frequency of a deduction or earning entered on this screen is specified as more frequent than the employee’s pay frequency, the deduction or earning is applied to the employee’s pay only when the employee is paid.
Here’s an illustration of deduction frequencies. Company ABC Inc. has employees in each of the pay frequency categories (D = Daily, W = Weekly, B = Bi-monthly, S = Semi-monthly, M = Monthly, Q = Quarterly). March 1st is the beginning of the current quarter.
The following table gives an example of how ABC Inc. uses the frequencies to process deductions for each of their pay periods. Monthly employees are paid on the first day of the month and semi-monthly employees are paid on the first and fifteenth day of each month. Weekly and bi-weekly employees are paid on Mondays.
|
Pay Period Ending Dates |
Applicable Deduction/ |
|
November 1, 2004 |
D, W, B, S, M, Q |
|
November 8, 2004 |
D, W |
|
November 15, 2004 |
D, W, B, S |
|
November 22, 2004 |
D, W |
|
November 29, 2004 |
D, W, B |
|
December 1, 2004 |
D, S, M |
|
December 6, 2004 |
D, W |
|
December 13, 2004 |
D, W, B |
|
December 15, 2004 |
D, S |
|
December 20, 2004 |
D, W |
|
December 27, 2004 |
D, W, B |
|
January 1, 2005 |
D, S, M |
When Calculate payroll is run a union deduction is taken regardless of whether other permanent deductions and earnings frequencies are selected. A union deduction is taken regardless of whether the pay is from regular, special, vacation or holiday hours.
Type/amount
For the Type field select either (blank), per period, percent or hour.
|
Format |
Drop down list, select 1 or three options or leave it blank |
|
Example |
Press <Enter> to default to blank |
For the amount field, enter the amount of deduction for union dues paid by this employee.
|
Format |
9999.999 fixed amount per pay period 99.999 percentage of gross wages (regular pay, plus overtime pay, plus special pay) 9999.999 dollar amount per hour of work reported (for regular hours, vacation hours, overtime hours, and special hours) |
|
Example |
Not enterable in this example. |
If a union deduction is not entered, this field is skipped. These are the valid pay frequencies:
|
Daily |
|
Weekly |
|
Bi-Weekly |
|
Semi-Monthly |
|
Monthly |
|
Quarterly |
Enter a pay frequency or use the option:
|
<Enter> |
To use the employee’s pay frequency specified in Pay frequency field. |
|
Format |
Drop down list |
|
Example |
Not enterable in this example. |
If no union deduction was entered, this field is skipped. Otherwise, enter the number of the G/L account that union deductions are posted.
|
Format |
Your standard account number format, as defined in Company information |
|
Example |
Not enterable in this example. |
Amount
Enter the amount deducted for repayment of a loan. The loan may be owed to the employer, or the employer may be collecting it for a credit union affiliated with the company.
You can press <Enter> to default to zero.
|
Format |
99999.99 |
|
Example |
Press <Enter> |
If no loan deduction is entered, this field is skipped.
The frequency must be one of the valid pay frequencies:
Daily, Weekly, Bi-weekly, Semi-monthly, Monthly, or Quarterly.
Options
Enter the pay frequency or use the option:
|
<Enter> |
To use the pay frequency specified for this employee in the Pay frequency Field. |
|
Format |
Drop down list |
|
Example |
Press <Enter> |
If no loan deduction is entered, this field is skipped and set to zero.
Enter the balance due on the loan.
When a loan deduction is made from the employee’s pay, either through the Time worked or the Adjustments selection, the balance due is automatically adjusted by the amount of the deduction.
|
Format |
999999.99- |
If a zero balance due is entered, you are asked, Balance due is $0.0 — is this OK?. Respond Y to confirm, or N if this is an error.
Type/amount
For the Type field select either (blank), per period, percent of gross, or percent of net.
|
Format |
Drop down list, select 1 of three options or leave it blank |
|
Example |
Press <Enter> to default to blank |
For the amount field, enter the amount of any garnishment deduction from the employee’s pay.
|
Format |
9999.999 fixed amount per pay period 99.99 percentage of gross pay 99.99 percentage of net pay after taxes |
|
Example |
Not enterable in this example. |
If the amount entered for garnish deduction was zero, this field is skipped.
This is the frequency at which the garnish deduction is taken. The frequency entered consists of one letter and must be one of the valid pay frequencies for the Payroll package:
Daily, Weekly, Bi-weekly, Semi-monthly, Monthly, or Quarterly.
Enter the frequency or use the option:
|
<Enter> |
To use the employee’s pay frequency specified in the Pay frequency field. |
|
Format |
Drop down list |
|
Example |
Since no garnish type was selected for this employee, this field is skipped. |
If the garnish deduction was entered as zero, this field is skipped. Otherwise, enter the balance due for which the employee’s pay is being garnished.
The balance due is automatically adjusted whenever a garnish deduction is made through either the Time worked selection or the Adjustments selection.
|
Format |
999999.99 |
|
Example |
Since no garnish type was selected for this employee, this field is skipped. |
If a zero balance due is entered, you are asked, Balance due is $0.0 — is this OK?. Respond Y to confirm, or N if this is an error.
The following fields and options enables an employer to deduct amounts from employee's pay for both regular 401(k) and Roth 401(k) plans. A regular 401(k) plan is a “before tax payroll deduction” while the Roth 401(k) plan option is an "after tax deduction". The former defers income tax until retirement when withdrawals from the plan are subject to income tax while the Roth plan withdrawals are not subject to income tax (including the capital gain portion). Also see 401(k) Plans
Reporting of 401(k) amounts may be done using the 401(k) contributions report. See 401(k) Contributions Report section in the Employee Reports chapter. The Regular and Roth fields may also be specified and reported using the quarterly and annual reports.
The entry you make in this field defines the employee’s 401(k) status.
Options
Enter one of the following options:
|
Catch up plan |
If the employee participates in a 401(k) plan and the employee is eligible for the 401(k) Catch Up provision |
|
Yes |
If the employee participates in a 401(k) plan but is NOT eligible for the 401(k) Catch Up provision |
|
None |
If the employee does not participate in a 401(k) plan at all |
This extended amount will be limited by the sum of the normal 401(k) maximum plus the catch-up maximum as specified in the Federal Tax Table. See the Max 401k deferral field in the Federal Tax Code section of Tax Tables chapter for more information.
|
Format |
One option above from the Drop down list |
|
Example |
Select None |
This field cannot be entered if you selected None for the Employee 401k plan field.
Otherwise, enter the code for the employee’s contribution to this plan. This must have already been defined as a Type K entry (employee elective deferral code) in the Deductions and Earnings selection. See the 401(k) Elective deferral Code section of the Deductions/Earnings chapter.
The Deductions and Earnings chapter also explains how the traditional and Roth amounts are printed on checks and mailers.
|
Format |
Three characters |
|
Example |
Since None was selected for the Employee 401k Plan type field, this field cannot be entered |
This field cannot be entered if you selected None for the Employee 401k plan field.
For the Type field select either (blank), per period, percent, or per hour.
If the employer is is also contributing, enter the same type for both the Traditional and employer Type fields.
|
per period |
As a flat dollar amount per pay period |
|
percent |
As a percent of the gross |
|
per hour |
As a rate per hour |
In character mode use the <F1> key to cycle through the options of per prd, percent and per hr. The per period type is defaulted.
|
Format |
Drop down list, select 1 of three options or leave it blank Character mode: Select the <F1> key to cycle through the options. |
|
Example |
Since None was selected for the Employee 401k Plan type field, this field cannot be entered |
After selecting a type, you must enter the amount.
|
Format |
99999.99 (for dollar amount) 99.99 (for percent) 99999.99 (for rate) |
|
Example |
Since no 401(k) type was selected for this employee, this field is skipped. |
This field cannot be entered if you selected None for the Employee 401k plan field. Also, it cannot be entered if you did not check the Roth opt field for the selected Employee 401k plan.
For the Type field select either (blank), per period, percent, or per hour.
|
per period |
As a flat dollar amount per pay period |
|
percent |
As a percent of the gross |
|
per hour |
As a rate per hour |
In character mode use the <F1> key to cycle through the options of per prd, percent and per hr. The per period type is defaulted.
|
Format |
Drop down list, select 1 of three options or leave it blank |
|
Example |
Since None was selected for the Employee 401k Plan type field, this field cannot be entered |
After entering a type, you must enter the amount.
|
Format |
99999.99 (for dollar amount) 99.99 (for percent) 99999.99 (for rate) |
|
Example |
Since no 401(k) type was selected for this employee, this field is skipped. |
|
Note |
The 401(k) deduction (both the Employee's deduction and Employer's co-pay) will be deducted when one of the pay frequencies selected during Calculate payroll matches the frequency of the employee's 401(k) contribution, specified in the next field. The 401 (k) frequency can be different from the employee's pay frequency; for example, the employee could be paid semi-monthly but the 401(k) could be taken out only monthly. |
This field cannot be entered if you selected None for the Employee 401(k) plan field.
Options
Otherwise, enter how often the accumulated 401(k) deduction is applied to this employee’s pay. It must be one of the Payroll package’s valid pay frequencies:
Daily, Weekly, Bi-weekly, Semi-monthly, Monthly, or Quarterly.
|
<Enter> |
For the employee’s pay frequency specified in the Pay frequency field |
|
Format |
Drop down list |
|
Example |
Since None was selected for the Employee 401k Plan type field, this field cannot be entered |
Employer contributions
This field cannot be entered if you unchecked the Employee 401(k) plan field.
Otherwise, if the employer provides a matching contribution to the 401(k) plan enter the code for the employer’s portion of this plan. This must have already been defined as a Employer matching contribution deduction type in the Deductions/Earnings selection.
If no matching contribution is provided press <Enter>.
|
Format |
Three characters |
|
Example |
Since None was selected for the Employee 401k Plan type field, this field cannot be entered |
This field cannot be entered if you selected None for the Employee 401(k) plan field.
Otherwise, enter the employer’s contribution. The mode of entry (amount, percent, or rate) must be the same for the employer as for the Traditional employee type, although the actual numeric values may be different for the amount.
|
Format |
Drop down list, select one of three options or leave it blank |
|
Example |
Since None was selected for the Employee 401k Plan type field, this field cannot be entered |
In character mode use the <F1> key to cycle through the options of per prd, percent and per hr. The per period type is defaulted.
After entering a type, you must enter the amount.
|
Format |
99999.99 (for dollar amount) 99.99 (for percent) 99999.99 (for rate) |
|
Example |
Since no 401(k) type was selected for this employee, this field is skipped. |
This field cannot be entered if you selected None for the Employee 401(k) plan field.
Otherwise, enter the maximum annual amount for this employee of employer matching contribution to the 401(k) plan.
The employer maximum annual amount of contribution is based on IRS rules and regulations. Consult your tax guides to determine the maximum employer contribution.
|
Format |
99999.99 |
|
Example |
Since no 401(k) type was selected for this employee, this field is skipped. |
Frequency
This field cannot be entered if you selected None for the Employee 401(k) plan field.
Otherwise, it is set automatically and is the same as the employee’s 401(k) deduction frequency.
Options
You can also enter one of the following from the Options menu:
|
Extended information |
To enter extended information |
|
Employee notes |
To enter notes |
|
Multi-city/state detail |
To enter multi-city / state detail. In order for this selection to be available, on the Taxes/Exemptions tab you must have indicated that this employee will be taxed by multiple states or cities. |
|
Direct deposits |
To enter direct deposits. In order for this selection to be available, on the General tab you must have indicated that this employee will be paid via direct deposit and in Control information you must indicate that this is an Electronic payment direct deposit type. |
On this tab you enter the employee fixed deductions:
The third character screen lets you enter employee fixed and variable deductions/earnings.
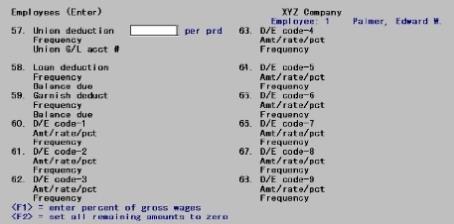
Deductions/Earnings
The fields on this tab consist of nine groups of fields. Each group specifies a type of deduction or earning that is applied regularly to the employee’s pay, the amount of the deduction or earning, and the frequency with which it is applied.
Enter the first deduction/earning code (D/E) for this employee. The code entered must exist in Deduction Codes. After you enter the code, the description of that D/E code from Deduction Codes displays.
If you press <Enter> for the D/E code, this field is skipped, the amount/rate/percent field is set to zero, and the frequency field is skipped.
The D/E codes entered here are for permanent deductions or earnings (deductions or earnings that are applied every pay period according to the deductions/earnings frequency entered).
D/E codes for meals, tips, supplemental earnings, or worker’s compensation are not allowed here. The only codes allowed are type D for deductions, B for before-tax deductions, E for earnings, and X for special tax deductions.
Very irregular earnings or deductions should be entered using the Time worked selection.
|
Format |
Three characters |
|
Example |
Type D1 |
Type/Amount
If this is a Type X deduction, the amount of the deduction is calculated automatically by Calculate payroll (based upon the rate or percent for that deduction), so this field is skipped.
Options
Otherwise, enter the dollar amount of the deduction, or use the option:
|
<F1> |
In character mode, to toggle between taking the deduction as a fixed amount per pay period (the initial setting), as a percentage of the employee’s taxable gross pay for the pay period, or as a rate per hour |
Type field
|
Format |
Drop down list with the choices of per period, percent and per hour |
|
Example |
Select per period |
Amount field
|
Format |
99999.99 fixed amount per period 99.99 percentage of gross pay 9999.999 rate per hour |
|
Example |
Type 10 to enter $10.00 as the deduction amount. |
Frequency
Options
If <Enter> is pressed for D/E Code-1, this field is skipped. For type X deductions, the frequency is automatically set to the employee’s pay frequency. Otherwise, enter the frequency with which the deduction/earning is applied to this employee’s pay. It must be one of the Payroll package’s valid pay frequencies: Daily, Weekly, Bi-weekly, Semi-monthly, Monthly, or Quarterly.
|
Format |
Drop down list with the choices listed in the paragraph above. The default is the same as in the employee's pay frequency field |
|
Example |
Press <Enter> |
Balance
Options
Enter the balance due or use the option:
|
<F2> |
For Unlimited |
|
Format |
999999.99- |
|
Example |
Press <F2> Skip fields D/E 2 through D/E 9 |
If a zero balance due is entered, you are asked, Balance due is $0.0 — is this OK?. Respond Y to confirm, or N if this is an error.
D/E 8 through D/E 9
D/E 8 and 9 are reserved by the system for direct deposit and 401(k) plans respectively. If either of these features have been chosen for this employee, the corresponding field displays as Read-only field.
|
Note |
Never enter or calculate deduction amounts that are greater than the amount of an employee’s check. The system cannot calculate taxes on negative amounts. |
Options
You can also use one of the selections from the Options menu:
|
Extended information |
To enter extended information |
|
Employee notes |
To enter notes |
|
Multi-city/state detail |
To enter multi-city / state detail. In order for this selection to be available, on the Taxes/Exemptions tab you must have indicated that this employee will be taxed by multiple states or cities. |
|
Direct deposits |
To enter direct deposits. In order for this selection to be available, on the General tab you must have indicated that this employee will be paid via direct deposit and in Control information you must indicate that this is an Electronic payment direct deposit type. |
The final tab displays as follows:
The final character screen displays as follows:
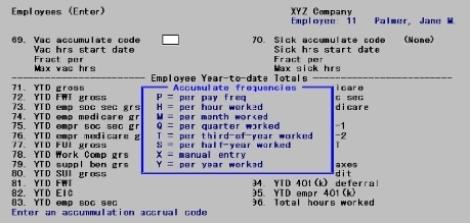
This screen contains year-to-date (YTD) figures for earnings, deductions, withholding, etc.
Normally, a new employee would start off with zeros in all these fields. Also, at the beginning of a new calendar year, you normally set all YTD fields to zero through the Year-End Payroll selection.
These fields are protected from change when in change mode. For the meaning of this term, refer to the System User documentation. In add mode, the YTD figures can be entered — not for the benefit of new employees, but for convenience when initially installing PBS Payroll.
When payroll checks and adjustments are posted, the YTD fields in Employees are automatically updated.
These YTD fields are used to control cutoffs on the payroll calculations, and to print on the Payroll Register and check stub.
The quarter-to-date and year-to-date history information used to print the Quarterly Payroll Report and Year-End Payroll Report is maintained in a separate data sets and is updated only when adjustments or printed checks are posted.
If you install this package in mid-year, initially set these Employee's fields to zero. Adjustments should then be entered and posted for each employee’s quarterly totals, in order to create accurate quarter-to-date and year-to-date history information.
Options
Enter the year-to-date gross wages, or use the option:
|
<F2> |
To set all fields on the screen to zero, and move the cursor to Field number to change ? |
|
Format |
99999999.99- |
|
Example |
Press <F2> to set all fields to zero. |
Enter the year-to-date gross wages on which federal withholding tax was deducted.
|
Format |
99999999.99- |
|
Example |
(automatically set to zero by the <F2> at the YTD gross field) |
Enter the year-to-date gross wages on which the employee portion of social security was calculated. The amount should not exceed the maximum social security wages entered in the Maximum social security wages field of Tax tables for federal taxes.
|
Format |
9999999.99- |
|
Example |
(automatically set to zero by the <F2> at the YTD gross field) |
Enter the year-to-date gross wages on which the employee portion of medicare was calculated. The amount should not exceed the federal tax field 22. Maximum medicare wages entered in Tax tables.
|
Format |
9999999.99- |
|
Example |
(automatically set to zero by the <F2> at the YTD gross field) |
Enter the year-to-date gross wages on which the employer portion of social security was calculated. The amount should not exceed the maximum social security wages.
|
Format |
9999999.99- |
|
Example |
(automatically set to zero by the <F2> at the YTD gross field) |
Enter the year-to-date gross wages on which the employer portion of medicare was calculated. The amount should not exceed the maximum medicare wages.
|
Format |
9999999.99- |
|
Example |
(automatically set to zero by the <F2> at the YTD gross field) |
Enter the year-to-date gross wages on which the employer’s contribution to federal unemployment insurance was calculated. The amount should not exceed the federal unemployment maximum wages entered in the Federal unemployment max wages field of Tax tables for federal taxes.
|
Format |
999999.99- |
|
Example |
(automatically set to zero by the <F2> at the YTD gross field) |
Enter the year-to-date gross wages on which the employer’s contribution to workers’ compensation was calculated.
|
Format |
99999999.99- |
|
Example |
(automatically set to zero by the <F2> at the YTD gross field) |
Enter the year-to-date gross wages on which supplemental benefit contributions are calculated. The amount should not exceed the supplemental benefit maximum wages entered in the Supplemental benefit max wages field of Tax tables for state taxes.
|
Format |
99999999.99- |
|
Example |
(automatically set to zero by the <F2> at the YTD gross field) |
Enter the year-to-date gross wages on which the employer’s contribution to state unemployment insurance was calculated. The amount should not exceed the SUI maximum wages entered in the Supplemental benefit max wages field of Tax tables for state taxes.
If you have specified Work state for SUI reporting method in Control information, the default value displayed in the YTD SUI gross field includes the employee’s SUI amount for only the state previously entered in the State tax code field.
|
Format |
999999.99- |
|
Example |
(automatically set to zero by the <F2> at the YTD gross field) |
Enter the year-to-date federal withholding tax.
|
Format |
99999999.99- |
|
Example |
(automatically set to zero by the <F2> at the YTD gross field) |
Enter the year-to-date earned income credit advance payments. The amount should not exceed the YTD maximum.
|
Format |
9999.99- |
|
Example |
(automatically set to zero by the <F2> at the YTD gross field) |
Enter the year-to-date employee social security taxes withheld. The amount should not exceed the YTD maximum.
|
Format |
99999.99- |
|
Example |
(automatically set to zero by the <F2> at the YTD gross field) |
Enter the year-to-date employee medicare taxes withheld. The amount should not exceed the YTD maximum.
|
Format |
99999.99- |
|
Example |
(automatically set to zero by the <F2> at the YTD gross field) |
Enter the year-to-date employer social security taxes. The amount should not exceed the YTD maximum.
|
Format |
99999.99- |
|
Example |
(automatically set to zero by the <F2> at the YTD gross field) |
Enter the year-to-date employer medicare taxes. The amount should not exceed the YTD maximum.
|
Format |
99999.99- |
|
Example |
(automatically set to zero by the <F2> at the YTD gross field) |
|
Note |
The following five fields, year-to-date SWT through CWT, are cumulative of all states regardless of whether the SUI reporting method field of Control information is set to Home state or Work state. |
Enter the year-to-date state withholding tax.
|
Format |
999999.99- |
|
Example |
(automatically set to zero by the <F2> at the YTD gross field) |
Enter the year-to-date other state tax withheld.
|
Format |
999999.99- |
|
Example |
(automatically set to zero by the <F2> at the YTD gross field) |
Enter the year-to-date other state tax withheld.
|
Format |
999999.99- |
|
Example |
(automatically set to zero by the <F2> at the YTD gross field) |
Enter the year-to-date employer portion of other state tax.
|
Format |
999999.99- |
|
Example |
(automatically set to zero by the <F2> at the YTD gross field) |
Enter the year-to-date city withholding tax.
|
Format |
999999.99- |
|
Example |
(automatically set to zero by the <F2> at the YTD gross field) |
Enter year-to-date other taxes.
|
Format |
999999.99- |
|
Example |
(automatically set to zero by the <F2> at the YTD gross field) |
If the control information field sets Use meals and tips to N, N/A will display.
Enter year-to-date tip credit.
|
Format |
999999.99- |
|
Example |
(automatically set to zero by the <F2> at the YTD gross field) |
If the control info field for 401k is set to N, N/A will display.
Enter year-to-date 401(k) elective deferrals.
|
Format |
999999.99- |
|
Example |
(automatically set to zero by the <F2> at the YTD gross field) |
If the control info field for 401k is set to N, N/A will display.
Enter year-to-date employer 401(k) matching contributions.
|
Format |
999999.99- |
|
Example |
(automatically set to zero by the <F2> at the YTD gross field) |
Enter the total number of hours worked since joining the company. This is the only field on the screen that is not year-to-date. It accumulates from one year to the next, unless you choose to set it to zero at year end using an option in the Close a year selection.
|
Format |
999999.99- |
|
Example |
(automatically set to zero by the <F2> at the YTD gross field) |
You can also use one of the selections from the Options menu:
|
Extended information |
To enter extended information |
|
Employee notes |
To enter notes |
|
Multi-city/state detail |
To enter multi-city / state detail. In order for this selection to be available, on the Taxes/Exemptions tab you must have indicated that this employee will be taxed by multiple states or cities. |
|
Direct deposits |
To enter direct deposits. In order for this selection to be available, on the General tab you must have indicated that this employee will be paid via direct deposit and in Control information you must indicate that this is an Electronic payment direct deposit type. |
There is little consistency in how different states and cities calculate their withholding taxes. To allow for these inconsistencies, an employee who works in many states may need many multi-city multi-state withholding information records.
If an employee is working in cities or states (referred to as work cities and work states) that have withholding requirements different from the employee’s home city or home state, you may need to create multi-city multi-state records for each work city or work state in order to calculate the employee’s withholding correctly. This is in addition to setting up the work city or work state withholding information using the Tax Table menu.
If you select multi-city multi-state information, the following screen displays:
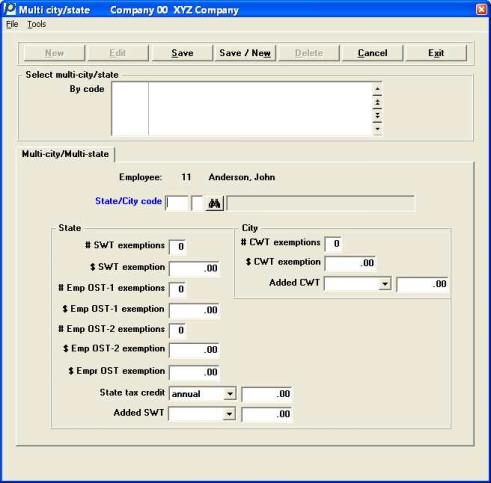
The fields on this screen correspond to Fields on the Taxes/Exemptions tab.
In character mode the following screen displays:
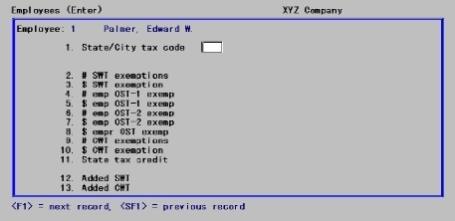
You can work with new or existing tax code records. Enter the following information:
Options
Enter the work city or work state tax code that applies to this employee. This field is entered in two parts, just as in the Tax tables selection.
|
<F1> |
For the next multi-city multi-state entry for this employee |
|
<SF1> |
For the previous entry |
|
Format |
Two characters (for the state or city) One character (for the table) |
|
Example |
Type MI and then type A |
If a state tax code is entered, you will not be allowed to enter information or make changes to the # CWT Exemptions, $ CWT Exemption and Added CWT fields. If a city tax code is entered, you will be allowed to enter information and make changes only to the CWT fields.
Enter the number of work state withholding tax (SWT) exemptions claimed by this employee, or press <Enter> to default to zero.
|
Format |
99 |
|
Example |
Press <Enter> |
Enter an additional dollar amount allowed by work state, if needed.
|
Format |
99999.99- |
|
Example |
Type 2200 |
OST Exemptions
The following 5 fields are used to enter exemptions for OST (other state tax). Refer to the discussion of the types of OST provided for in PBS Payroll at the beginning of the Deductions/Earnings chapter.
Enter the number of work state exemptions for employee OST-1, or press <Enter> to default to zero.
|
Format |
99 |
|
Example |
Press <Enter> |
Enter a work state additional dollar amount if needed.
|
Format |
99999.99- |
|
Example |
Press <Enter> |
Enter the number of work state exemptions for employee OST-2, or press <Enter> to default to zero.
|
Format |
99 |
|
Example |
Press <Enter> |
Enter a work state additional dollar amount if needed.
|
Format |
99999.99- |
|
Example |
Press <Enter> |
If there is a work state exemption amount for the employer OST enter the amount of the exemption here, otherwise press <Enter>.
|
Format |
99999.99- |
|
Example |
Press <Enter> |
Options
Enter the annual dollar amount of the work state tax credit for which this employee is eligible, or use the option:
|
<Arrows> |
To select an annual amount for the credit, a percentage rate used to calculate the tax credit or a surcharge percentage. If a percent is entered, the amount of the credit calculated and deducted before Added SWT is added into the tax amount. The default is amount |
|
Format |
99999.99- (annual amount) 999.99- (percentage rate) |
|
Example |
Type 64 |
A tax credit is an amount that is deducted from the calculated tax. Added SWT is added into the tax amount after the credit is taken.
Not all states allow a tax credit, so you don’t need to enter an amount here if it is not applicable to this work state.
Options
Enter the additional state tax to be withheld.
|
<Arrows> |
To select one of the three methods of data entry described in the Additional amount to be withheld section |
If the employee’s state tax code specifies a gross wage cut-off amount, this percent is calculated only on the taxable gross pay over the cut-off amount.
|
Note |
A negative amount or percent reduces the tax amount. |
|
Format |
99999.99 (amount) 99.99 (percent and surcharge %) |
|
Example |
Press <F2> and then type 5 to specify a bi-weekly increase in state withholding of $5.00. |
Enter the number of exemptions that apply for work city withholding tax (CWT) or press <Enter> to default to zero.
|
Format |
99 |
|
Example |
Press <Enter> |
Enter the annual dollar amount of the work city withholding tax exemption or press <Enter> to default to zero.
|
Format |
99999.99- |
|
Example |
Press <Enter> |
Options
Enter the additional city tax to be withheld.
|
<F2> |
To toggle between the three methods of data entry described in the Additional amount to be withheld section |
If the employee’s city tax code specifies a gross wage cut-off amount, this percent is calculated only on the taxable gross pay under the cut-off amount.
|
Format |
99999.99 (amount) 99.99 (percent and surcharge%) |
|
Example |
Press <Enter> to default to zero. |
Options
Make any needed changes, or use one of the following options:
|
<F1> |
For the next multi-city multi-state entry for this employee |
|
<SF1> |
For the previous entry |
|
<F3> |
To delete this entry for this employee (available only if this is an existing entry) |
Press <Enter> to accept this screen and return to the screen you came from (one of the four primary screens for this employee).
Using Notes
You can enter notes about this employee. Each note is given a date/time stamp so that you can browse through the notes in time sequence later. Although notes can be entered from each of an employee’s tabs, be aware that the note is attached to the employee and not to the screen — you will see the same note[s] for an employee regardless of which screen you happen to be on when you choose to look at notes.
Graphical Mode
The following screen displays:
Existing notes display in the list box. To browse through existing notes, use the up and down keys arrow keys.
Select New to enter a note. Select Edit to change an existing note. Select Save when you are done adding or editing a note.
The Notes entry shows three fields:
Date
Use this field to change the date. Today's date is always the default on a new entry.
Time
Use this selection to change the time of a note. The time on your workstation is always the default on a new entry.
Text entry box
When you select to enter a New note or edit an existing note, the cursor is positioned for you to enter the first line of the text of the note.
This selection use the PBS text editing function. You enter text in much the same way as most word processing programs, using <Enter>, <Up>, <Down>, <Left>, <Right>, or <Delete>. When you are finished entering text, press <Esc> and follow the screen instructions.
|
Format |
Ten lines of 77 characters each |
|
Example |
(Does not occur in this example) |
Character Mode
If you select to use notes, the following window displays:
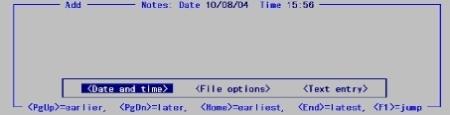
Text entry
Select Text entry to create a new note.
File options
Options
When you select File options, you have these choices:
|
Save |
Save what was entered/changed. |
|
Save / New |
Save what was entered/changed and start a new note. |
|
Cancel |
The program will ask if you want to "Cancel entry ?". Select Yes to cancel or No to continue editing. |
|
Exit |
If you are not editing a note the program will exit. If you are editing a note the program will ask if you want to "Cancel entry ?". Select Yes to cancel or No to continue editing. |
When you are through using notes, press <Esc>.
Use extended employee information to store additional data about your employees.
| • | This is often needed for state quarterly and annual electronic reporting. For example, some states require separate fields for an employee’s first name, middle initial, and surname. |
| • | You can also use these fields for any purpose your Personnel Department may desire. For instance, to record the name of the employee’s supervisor, his nationality, his job title, his military service status, his score on the most recent employee review, his education level, alternate address, alternate phone numbers, family member names, insurance number, etc. |
Before you enter employee extended fields, they must be defined using Define extended fields. You are allowed to define up to 36 employee extended fields. See Define Extended Fields in the Define Extended Fields chapter.
What and how much you can enter in an extended field depends on how you have defined it. An extended field can be either a character field (such as a name), a numeric field (such as number of employees or salary), or a date field.
Whatever the type of the field, you can enter information up to the size specified when the field was defined. An appropriate prompt will appear if one has been defined, as will a default value for the field.
Options
Extended fields are displayed sequentially down the screen in a window. To enter or change a field, first use the <Up> and <Down> keys to get to it.
Graphical Mode
To edit a field, select the enter key or click on it. A box will display at the bottom of the window where you can make your entry.
You have the following button options:
| Button | Keyboard | Description |
|
Save |
Alt +e |
To save what was entered or changed on a field. |
|
Exit |
Alt +x |
If no field changes or new entries were made you will be returned to the last screen.
If you made any changes, a Cancel Entry? message will display. If you select Yes any changes will be abandoned. If you select No you will return to the last field you edited. |
|
Cancel |
Alt +c |
Discard what was entered/changed. |
Character Mode
If there are more than 18 fields, use <PgDn> and <PgUp> to see all the fields. When done with entry or changes, press <Esc> and choose one of the file options as follows:
|
File |
Save what was entered/changed, clear the screen, and get ready for another note. (Like pressing <Enter> at Field number to change ? in other selections.) |
|
Save & continue |
Save what was entered/changed, but leave the information on the screen to continue to work. |
|
Abandon changes |
Discard what was entered/changed.(Like pressing <Esc> at Field number to change ? in other selections.) |
|
Delete |
Delete the entire comment (Like Delete in other selections.) You will be asked to confirm the deletion with an OK to delete ? message. |
|
Format |
As defined for each field in the Define extended fields selection |
|
Example |
No examples are given because no extended fields will be defined until the Define Extended Fields chapter has been reached. |
When you are finished entering notes for an employee, press <Esc>.
For setup, use and full explanation of jurisdictions, see the Pennsylvania Act-32 appendix.
Entries are located on a window accessed via the <Shift+F5> key combination. In graphical mode you may also select it from the Options menu. In character mode you may only access it from the second screen.
In graphical mode you must select to edit the employee first before you can enter these fields.
Enter the state jurisdiction information on the following window:
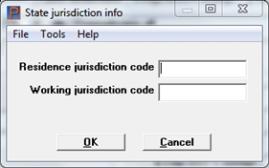
Enter the Employee Residence jurisdiction code.
Enter the Employee Work jurisdiction code.
Select OK to save your entry or Cancel to remove the changes.
Enter the next employee as follows:
Susan Levine is an hourly employee, paid bi-weekly at a regular hourly rate of 8.00, and has three deductions made from her paycheck each pay period: to pay union dues, repay a loan, and donate to a charitable cause.
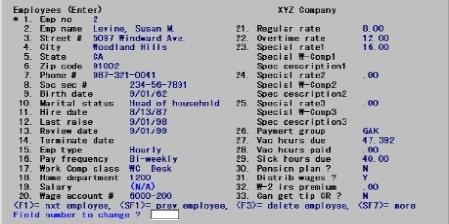
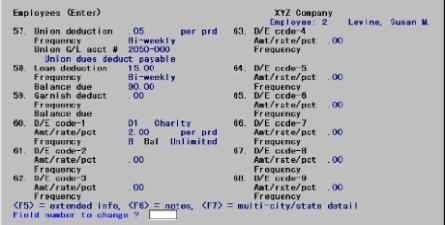
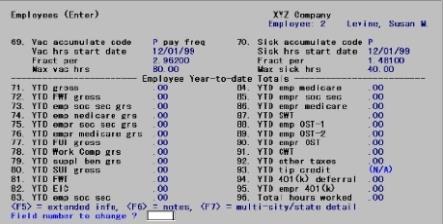
Employee number 3 is actually a non-employee (Select Non-employee in the Employee type field), an independent contractor who has been included in Employees for administrative convenience.
You can produce a 1099 Information report that assists in the preparation of an IRS Form 1099-MISC at the end of the year. Also, on screen 1, note that she is paid semi-monthly and is assigned to department 247 because she consults primarily on special projects with the staff of that department.
She is paid at the regular hourly rate of $25.00. On screen 2 you need to enter the State_tax_code field and press <Enter> for the Federal, State and City fields. On screen 3, you can press <F2> at the first field to enter zero for all of those fields. On screen 4, press <Enter> at fields 69 and 70 and then press <F2> to enter zeros in the remaining fields.
|
Example |
Enter another employee as shown here: |
Mr. Wilson, a sales rep, receives a salary of $1,000.00 on a semi-monthly basis. Additionally, he receives sales commissions and bonuses which are entered in the Time worked selection.
He is in department 325, has 4 withholding exemptions, belongs to the pension plan, and his pay is manually distributed to G/L accounts.
Wilson has amounts deducted from his paycheck to repay a loan, to donate to charity, and to make contributions to the pension plan.
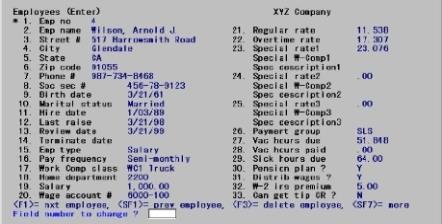
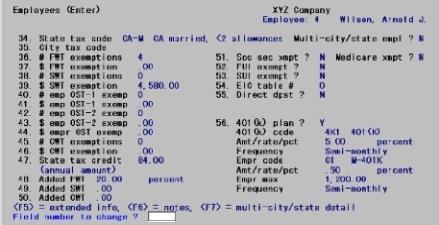
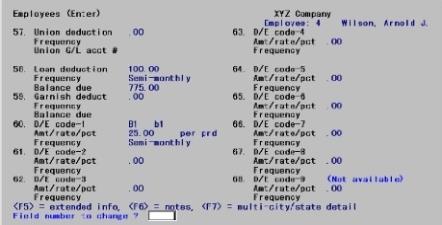
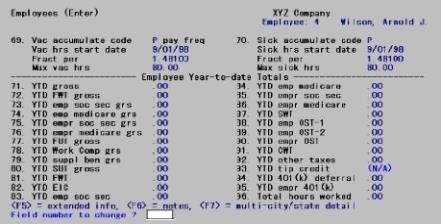
|
Example |
Enter employee number 5 as follows: |
Employee number 5, Wilkenson, receives a salary of $1,200.00 semi-monthly, and in addition receives sales commissions and bonuses, which are entered during the Time worked selection.
Wilkenson pays $75.00 semi-monthly on a loan, and he contributes $30.00 each pay period to the pension plan.
Also, on screen 3, note that Wilkenson receives a type of non-taxable earning called TRAVEL. This is a regular semi-monthly advance of $200.00 towards his travel expenses. Payment for additional travel expenses during a particular pay period can be made through the Time worked selection. Adjustments for overpayment can be made through the Adjustments selection.
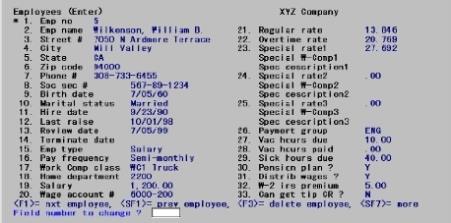
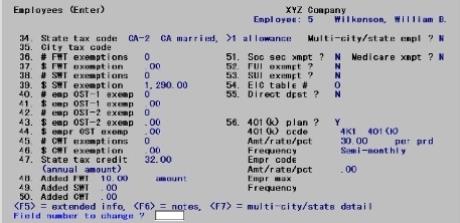
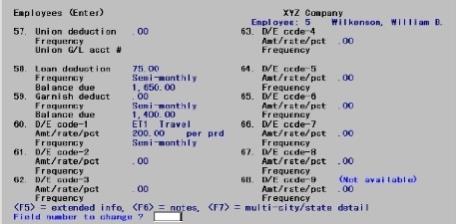
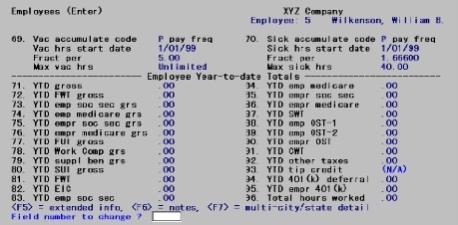
|
Example |
Enter employee number 6 as shown below. |
Katherine Delaney is an hourly employee, paid bi-weekly at a regular hourly rate of $4.00. She is a part-time employee who works 20 hours a week and is eligible for earned income credit. She claimed 1 certificate for advance payment of earned income credit
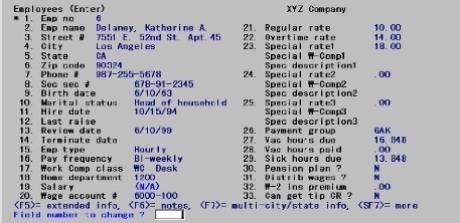
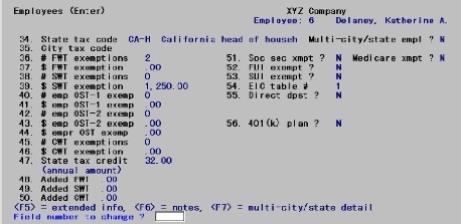
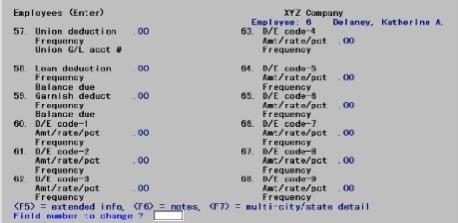
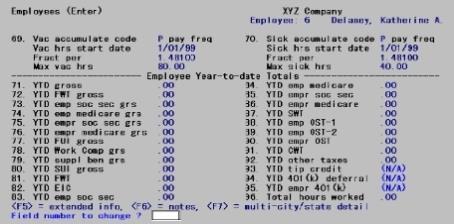
|
Example |
Enter employee number 7 as shown below. |
Peter G. Holmes is an hourly employee, paid bi-weekly. His regular rate of $4.50 is below the minimum wage, but is augmented by tips and meals.
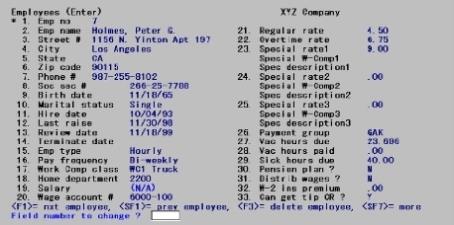
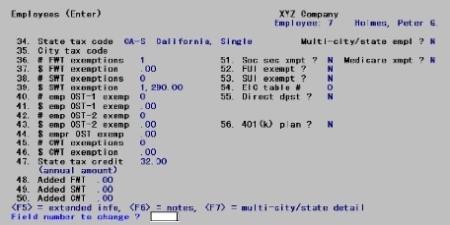
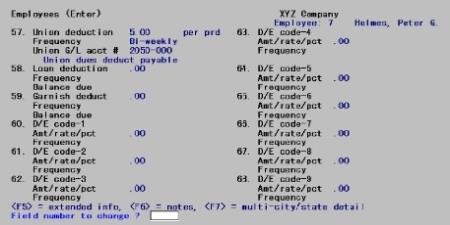
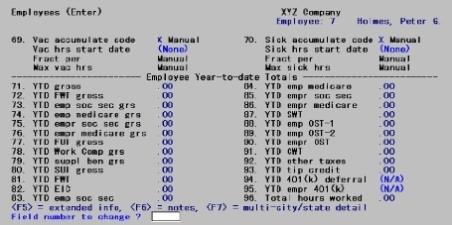
|
Example |
So that you can see a sample Change Log (described later), change employee # 1’s street address. Enter a new address of 715 Lemon Grove Crescent. |
Employees can be printed in number sequence or name sequence. This selection gives the former. The next selection describes the latter.
For security purposes only the last 4 digits print of the social security number print on the report. The first five digits are replaced with asterisks.
See a Employees by Employee # example in the Form and Report Examples appendix.
Select
Employees by employee # from the Reports, Employee/Employer menu. You may also select this report while in Employees from the Print menu.
The following tab displays:
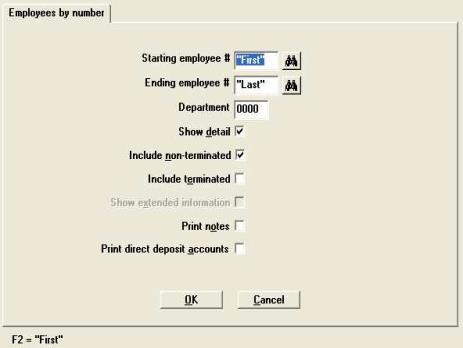
In character mode the following screen displays:
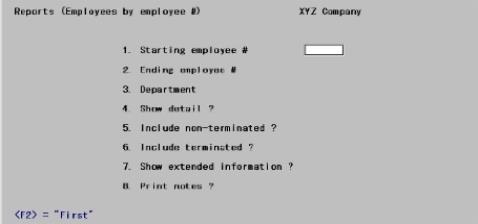
Enter the following information:
Enter the range of employee numbers to print in the report.
|
Format |
999999 at each field |
|
Example |
Press <F2> at each field for a range of First to Last. |
Options
Enter the number of the department to print employees for, or use one of the options:
|
<F5> |
To print employees for All departments |
|
<Enter> |
For the null department (blank if department is defined as alphanumeric, zero if defined as numeric) |
|
Format |
Four characters |
|
Example |
Press <F5> |
Press <Enter> to show details on the report, or select the space bar to remove the check mark to show only a summary.
|
Format |
Check box, checked is Yes and unchecked is No |
|
Example |
Press <Enter> |
Press <Enter> to include non-terminated employees on the report or type N to exclude them.
|
Format |
Check box, checked is Yes and unchecked is No |
|
Example |
Press <Enter> |
Check the box to include terminated employees on the report or press <Enter> to exclude them.
|
Format |
Check box, checked is Yes and unchecked is No |
|
Example |
Press <Enter> |
If showing detail, this field is not applicable. If showing summary, check the box to show extended information, leave it unchecked to not show it.
|
Format |
Check box, checked is Yes and unchecked is No |
|
Example |
Press <Enter> |
Check the box if you want to print employee notes or press <Enter> to not print notes.
|
Format |
Check box, checked is Yes and unchecked is No |
|
Example |
Press <Enter> |
Check the box if you want to print employee direct deposit bank accounts or press <Enter> to not print the accounts.
|
Format |
Check box, checked is Yes and unchecked is No |
|
Example |
Press <Enter> |
Press <Enter> or Click on OK to print the report.
Employees can be printed in number sequence or name sequence. This selection gives the latter. Number sequence has already been described in the previous section.
Name sequence prints the social security number, name street, city state zip, employee type and pay frequency. There are options to print extended information and employee notes.
This report also has an option to export TIN data to a text file. A TIN is a Taxpayer Identification Number. In this case, the TINs being tested are social security numbers. The file output includes the type (2 = Social Security Number) indicator, the Social Security number and the employee's last name with the fields separated by semi-colons. When selecting this option, the program will also print a report that includes the employee number, name and social security number.
For security purposes, your Control information may be set to only print the last 4 digits print of the social security number print on the report. The first five digits are replaced with asterisks.
Select
Employees by employee name from the Reports, Employee/Employer menu of the PR menu. You may also select this report while in Employees from the Print menu.
The following screen displays:
In character mode, the following screen displays:
Enter the following information:
Enter the range of employee names to print on the list. Follow the screen instructions.
The names you enter do not have to be actual employees’ names, so long as they define the desired range.
|
Format |
25 characters at each field |
|
Example |
Press <F2> at each field for a range of First through Last |
You may select either Standard or Generate TIN file export.
The Generate TIN file option will be available if the user has permission to access Employees (Enter). When the user does not have access to Employees (Enter) this field is defaulted to Standard and cannot be changed.
Selecting prints a report. Selecting Generate TIN file prints a report and generates a file. You will be asked where to save the file.
|
Format |
Drop down list, Standard is the default |
|
Example |
Select Standard |
If you checked the box (yes), terminated employees in Employees are included on the list, as long as they fall within the defined alphabetic range. You can press <Enter> to default to unchecked.
|
Format |
Check box, checked is Yes and unchecked is No |
|
Example |
Type <Enter> |
If terminated employees are included in the list, the total number of terminated employees and the termination dates are printed.
This field cannot be entered if you did not select Generate TIN file for the Report type field and you did not check the Include terminated field.
Enter the current or prior year since which you want to include terminated employees or use the option:
|
<F5> |
To include terminated employees for "All" years |
|
Format |
CCYY. For graphical mode you may use the drop down list. The current payroll year is the default |
|
Example |
This field is not available because you did not check the Include terminated field. |
Enter either employee Phone number or Employee information.
|
Format |
Drop list, Employee information is the default |
|
Example |
Select Phone number |
Select the space bar (check the box) to print extended information, or <Enter> to not print it.
|
Format |
Check box, checked is Yes and unchecked is No |
|
Example |
Press <Enter> |
Answer Y if you want to print employee notes.
|
Format |
Check box, checked is Yes and unchecked is No |
|
Example |
Press <Enter> |
Press <Enter> or click on OK to print the report. Select Cancel to not print.
After selecting to print the report a list of printers display.
The software differentiates between upper and lower case letters. Names containing lower case letters are printed after names containing all upper case letters.
Use this selection to print employee labels. The labels printed by this function must be continuous form paper with standard pin-feed holes on the sides (or laser label sheets for laser printing). There must be exactly one inch vertically from the top of one label to the top of the next label.
Labels can be either one-across (one label wide) or two-across (two labels side-by-side). 3-1/2 X 15/16 labels are recommended. If two-across labels are used, the best results are obtained when there is a 1/10 space between 3-1/2 X 15/16 labels.
4 X 1 butt cut labels can also be used. Butt cut labels have no space between labels.
For a laser printer, you can use any one of the following label sizes:
| • | 4 inches wide by 1 inch high (20 per page) |
| • | 4 inches wide by 1-1/3 inches high (14 per page) |
| • | 4 inches wide by 1-1/2 inches high (14 per page) |
When printing employee labels on a laser printer, you are asked to choose one of these labels sizes.
Select
Employee labels from the Reports, Employee/Employer menu.
Graphical Mode
The following screen displays:
Character Mode
Options
Enter the number of labels to print for this employee or use the option:
|
<Enter> |
To get a count of labels without actually printing them |
|
Format |
9 |
|
Example |
Press <Enter> |
Enter either 1 for by employee name or 2 for by employee number.
|
Format |
9 |
|
Example |
Type 2 |
Ending employee number
Enter the range of employee numbers for this label printing.
|
Format |
999999 at each field |
|
Example |
Press <F2> at each field for a range of First through Last |
Ending employee name
Enter the range of employee names for this label printing.
|
Format |
25 characters at each field |
|
Example |
Press <F2> at each field for a range of First through Last |
Options
Enter the department for which you want these employee labels printed or use the option. Follow the screen instructions.
|
<F5> |
To print employees for "All" departments |
|
<Enter> |
For the null department (blank if department is defined as alphanumeric, zero if defined as numeric) |
|
Format |
9999 |
|
Example |
Press <F5> |
Answer Y if you want to include non-terminated employees.
|
Format |
Graphical: Check box where checked is yes and unchecked is no. The default is checked Character: One letter, either Y or N. The default is Y |
|
Example |
Leave it checked or type Y |
Answer Y if you want to include terminated employees.
|
Format |
Graphical: Check box where checked is yes and unchecked is no. The default is unchecked Character: One letter, either Y or N. The default is N |
|
Example |
Leave it unchecked or type N |
After making any needed changes, select OK or press <Enter> to print the labels (or to obtain a count, if that is what you requested in # labels per employee field).
Graphical Mode
Mount labels
There are 2 fields on the mount labels window.
You may choose to print the labels. Enter the number of labels to print.
Please mount labels on the printer, and check this box when done
Mount labels on the printer and then check the box.
Select OK to continue or Cancel to return to the previous screen. If you select, OK you may choose a printer.
Laser Margins
On this window enter the number of columns of labels to print when asked (1 for one-across, 2 for two-across labels). Select OK to continue or Cancel to return to the Mount labels screen.
Print alignment
Next, Print alignment ? displays. The default is No to not print an alignment. If you choose, select Yes to cause X’s to be printed on the first row of labels.
If you printed an alignment, the Print alignment ? window displays again. If the X’s just printed are properly aligned, select No and label printing begins. If they are not properly aligned, either adjust the labels in the printer or if a laser printer, change the top margin or left margin alignment and select Yes again. Repeat this procedure until the labels are properly aligned. (Remember, you can interrupt printing by pressing <F1>.)
The Print employee labels screen redisplays for entry of another range of employee labels to print. If you are done printing labels, select Cancel and the Mount regular paper window displays.
On this window the following message displays:
If you mounted labels on the printer replace them now with regular paper, and check this box when done.
Check the box and select OK to return to the menu.
Character Mode
Mount labels on the printer and then type DONE. Choose a printer. Enter the number of columns of labels to print when asked (1 for one-across, 2 for two-across labels). Any change ? displays after this question, to allow you to change your answer.
Next, Print label alignment ? displays. Answer Y to cause X’s to be printed on the first row of labels.
Print label alignment ? displays again. If the X’s just printed are properly aligned, answer N and label printing begins. If they are not properly aligned, adjust the labels in the printer and answer Y again. Repeat this procedure until the labels are properly aligned. (Remember, you can interrupt printing by pressing <F1>.)
The Print employee labels screen redisplays for entry of another range of employee labels to print. You can press <Esc> to return to the menu.
This report lists employees with tax obligations to more than one city or more than one state.
Select
Multi-city and multi-state info from the Reports, Employee/Employer menu.
The following screen displays:
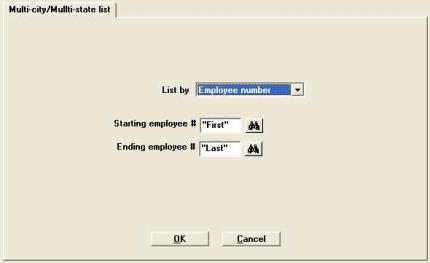
In character mode the following screen displays:
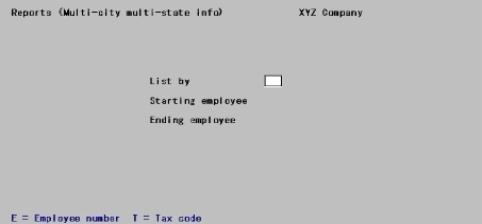
Enter the following information:
Enter either Employee number or Tax code.
|
Format |
Drop list, either Employee number or Tax code |
|
Example |
Select Employee number |
Depending on what you select above, either fields for Starting and Ending employee will display or Starting and Ending tax code.
Enter the range of employee numbers to print in the report.
|
Format |
999999 at each field |
|
Example |
Press <F2> at each field for a range of Starting through Ending employee |
Ending tax code
If you selected to print by tax code in the List by field, enter the range of tax codes to print on the report.
After selecting state or city, enter the desired tax code. Any input is accepted; however, only a valid tax code already defined in the Tax tables selection is meaningful. See the Tax Tables chapter. Only tax codes that have been assigned to an employee that has a multi-city or multi-state setup will print. You can also use the option:
|
<F2> |
For "First" and "Last" codes respectively |
|
Format |
Two characters (for state or city) One character (for the individual tax table within that state or city) |
|
Example |
(Not used in this example.) |
Select the <Enter> key or click on OK to print the report. Select <Esc> or click on Cancel to not print.
When selecting the print a list of printers will display. Select a printer.
If use of change logs has been specified in Company information, you are allowed to print the Employee Change Log. The Change Log shows any changes or deletions to Employees. It also prints the initials of the user who made the changes and the date these changes were made.
For security purposes only the last 4 digits print of the social security number print on the report. The first five digits are replaced with asterisks.
Select
Employee change log from the Reports, Employee/Employer menu.
You are prompted to Purge change log. Select Yes (enter Y) if you want Change Logs to be cleared, or select No (enter N) if you want the change log information to remain on file. The default is unchecked or N.
If you selected Yes, a menu displays for you to select where to print the Change Log. (You do not have the option of displaying the report or Create HTML, since purging the Change Log is an Audit Trail function.)
If you selected No, the same menu displays, with an additional option to display the log on the screen and Create HTML. Follow the screen instructions.
|
Example |
Press <Enter> or N to not purge the change log. |
If you selected to purge, select OK to purge the file and print a report. If you selected not to purge, select OK to print or display the report.
Select Cancel to return to the menu.
This option is only available if you are using the direct deposit Electronic payment method as set in the PR Control information. You must be licensed for Payroll ACH Direct Deposit in order to use the Electronic payment method.
There are two possible statuses for an ACH employee; Pre-Notification and Normal.
| • | A Pre-Notification means that you are notifying the bank that there are new employees or changes to existing employee’s bank account information when using ACH payments. This gives your bank time to verify the routing and bank account numbers before you do your next check run. |
| • | A Normal status means that the account has gone through the pre-notification process with your bank and it is now OK to make a payment to the employee via ACH electronic processing. |
This utility is used to create an ACH file of Pre-Notification employee bank accounts or to update an employee bank account Pre-notification status from Pre-note to normal.
You can also report Pre-notification bank accounts using the Checks function. You are not required to use this utility to report Pre-notification bank accounts. The advantage of using this utility is you do not have to wait to print checks to report the Pre-note accounts to your bank. However, you should give your bank people ample time to verify the pre-notification accounts, and update the status to normal before you do your next check run. Otherwise you will report the same Pre-note accounts a second time during the next check run.
The ACH file created using this process will only contain Pre-notification records. The name of the file will be the same as when creating a check run ACH file. See Appendix F Implement ACH Direct Deposit for more information on the ACH file and where it is created on the system.
Select
Pre-note ACH file and report from the Utilities menu.
You will see a screen like the following:
Graphical Mode
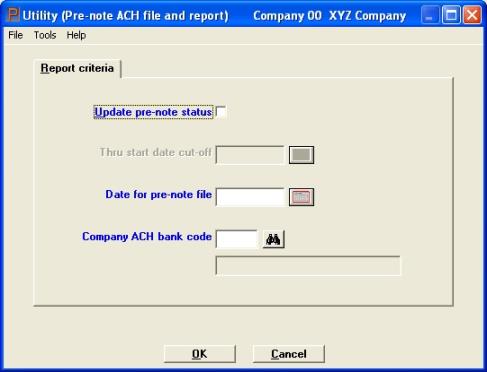
Character Mode
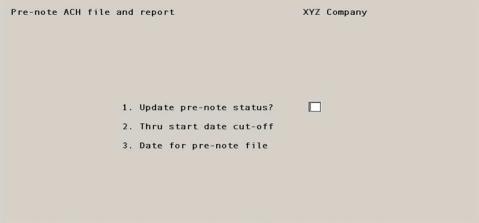
Enter the following fields:
Enter Y if you want to update the status of the pre-note employee bank accounts from Pre-notification to Normal status. Enter N if you are generating a Pre-note ACH file.
|
Format |
1 letter, either Y or N |
|
Example |
Enter N |
If you enter N for the this field, the next field is skipped and cannot be entered.
Enter the cut-off date.
This field relates directly to the start date entered for the employee bank account on Employees Direct deposit field. If the date you enter here is on or after the bank account start date then the status will be updated to Normal. If it is before the start date then the bank account start date will not be effected.
|
Format |
MMDDYY |
|
Example |
Type 10107 |
This is the date written to the ACH file for the pre-notification accounts.
Enter the date to be used for the employee pre-notification ACH records.
|
Format |
MMDDYY |
|
Example |
Type 30208 |
Enter the bank account code for which you are reporting. The bank information will be written to the ACH file.
|
Format |
4 characters |
|
Example |
Enter 1 |
Make any changes or select Enter to generate the ACH file or update the bank account records.